 6 minute read
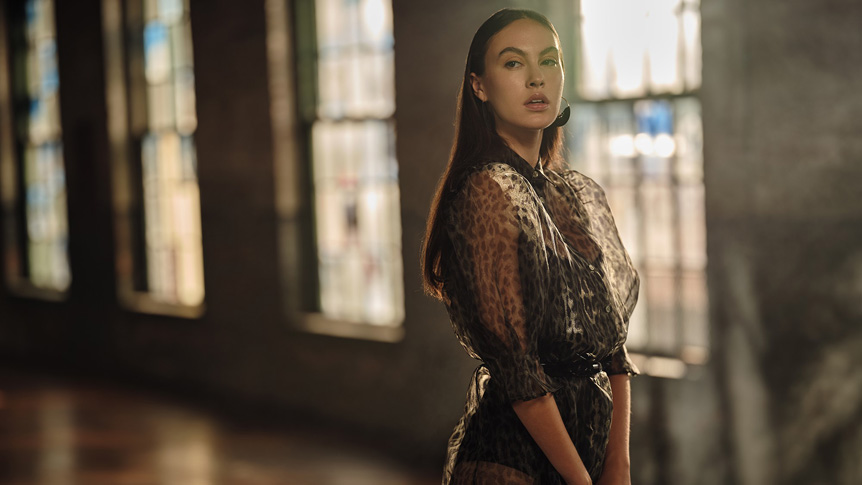
Get the Look: Recreate Sunlight
Any photographer would leap at the chance to have perfect natural light any time, any place. You can’t bottle the sun itself, but you can achieve the same results with this artificial lighting technique
Photographers notice great light all the time. It could be at home, on the street, in a public building like a library or restaurant, or an old industrial space, like the example here. Many locations have it, and are great places to photograph, but the trouble with ambient light is that it can’t be relied on. As great as it can be, it’s fleeting and uncontrolled.
This space has large windows, and when the sun pops through, the light is fantastic. I would work there without flash if it was practical – but it’s not. Available light changes from moment to moment with the weather. From one day to another it’s rarely the same, so a location that looked great when scouting, may be unsuitable come the day of the session. For a commercial project, that’s no good.

Photo 2022 © Ab Sesay
Clients depend on you controlling the light to give a location the look they imagined. But by the time the model has gone through five outfits and three makeup changes, the natural light will be completely different from when you started. With the controllability of flash, it makes no difference if a session starts at 9am and runs until 5pm, because we can reproduce the same exact light picture after picture – even if the ambience changes slightly. That controllability means you get the light you want, in combination with a full working day.

Photo 2022 © Ab Sesay | FUJIFILM GFX100 and FUJINON GF110mmF2 R LM WR, 1/125 sec at F2, ISO 125
Motivating the Practical
Here, we took inspiration from the light we saw and recreated it in a natural way using flash. The key term is ‘natural’. We do not want artificial. It has to look lit by the sunlight that inspired it. So, the lights must be placed and powered accordingly.
This is sometimes called ‘motivating the practical’, a term that grew out of movie making, but is just as relevant for stills. It means taking what’s really there, ‘the practical’ – whether that’s sun, or lamps in a scene – and adding lights to improve and control it, without losing what makes it special.
The lighting in this image is motivated 100% by the sun. But if I was lighting an interior, like a restaurant with lamps and chandeliers, my lighting choices would be motivated by those practical elements instead.

Photo 2022 © Ab Sesay | FUJIFILM GFX100 and FUJINON GF110mmF2 R LM WR, 1/125 sec at F2.5, ISO 400
Setting Up for Sunlit Perfection
To motivate the practical, you need to observe and understand it. Only then can you recreate it effectively. First, I looked at the natural light in the space, and how it was hitting the subject from huge windows to the camera left. It was edging her, but also bouncing around in the room and providing the overall exposure.
That means my key light is effectively the reflection from the room itself, rather than an individual flash. This choice is one of the things that keeps it looking natural. In ambient light, there will often not be a single, dominant source – just reflected light adding to a whole.

Photo 2022 © Ab Sesay

So, we need to light the whole room, not just the subject. The first light I added was a medium-sized octabox above the model, placing it high enough to be out of frame – even at a wide framing – then composed from behind it. This creates a flat, soft fill light, as though there’s a bank of north-facing windows behind me.
Then I added lights outside. These blast through the windows, creating the effect of the sun being low in the sky on a cloudless day. This naturally adds the shapes of light on the floor. For this, I fitted normal 7-inch reflectors and positioned them as far away from the windows as I could, keeping the light broad and hard, like sunlight would be. If the lights were too close to the window, it’d be clearer they were artificial. If you wanted diffused light, as per an overcast day, you could use softboxes, but they’re more likely to blow over outdoors and need great care. The only diffusion in this setup is from the glass in the windows – which is dusty and old.

Photo 2022 © Ab Sesay
The last of the four lights is off to the camera right, and gives me a little bit more control of the accent light – useful if the subject steps out from the light coming through the windows.
Because we’re lighting the whole room, this is not a restricted setup, and the subject can actually move around with freedom. As the fill light is so important here, for this session it’s on wheels, so I could easily match any movement from the model. But in a space like this, remember to experiment, too. I actually found some of my favorite images came when she stepped out of the fill light slightly.


Photo 2022 © Ab Sesay | No lights
Photo 2022 © Ab Sesay | Octabox
Photo 2022 © Ab Sesay | Octabox and exterior lights
Photo 2022 © Ab Sesay | All lights
Add Atmosphere with Haze
A lot of setups benefit from haze. It gives the light something to grip on to, letting you see and understand the quality better. In this example, we see sun rays streaking through the haze and it adds to the atmosphere. It also contributes depth and separation to a large space.
When using a haze machine, here are a few tips. Always start hazing the location at least an hour prior to photography. This will give time to see how much is needed and how quickly it is being pulled out of the space by draughts or air conditioning. If draughts can’t be stopped, observe how the smoke is moving and set up accordingly. For this session, it was being pulled towards the back door, so we framed that way intentionally to stop the smoke going behind me.
The priority is to have a machine capable of efficiently hazing the space. Low-capacity machines won’t do the job in large spaces. Haze the room so it all turns solid, then let it dissipate until you get to the sweet spot, and can see how much works in that environment – the point where it’s giving atmosphere and depth, but not causing flare or lowering the contrast too much.

Photo 2022 © Ab Sesay
Doing It on a Smaller Scale
Because you’re working inside, lots of power isn’t a requirement here. I was mainly exposing around F2, so the same lighting can be done with speedlights. The fill light would still need a large diffuser, but the other lights could be used unmodified, as the raw output of a speedlight gives a sunny look.
The one thing I definitely want in a setup like this is an assistant. Even though I can control the external lights wirelessly, it’s a lot of legwork to get there and back. Probably 20 yards to the door, then around the side of the building just to adjust position – or pick up if they’ve fallen over. With an assistant, I can look through the window and tell them how to place the lights, while observing their effect.
In the next article, we look at how to manage a demanding e-commerce job involving a full day of costume changes, while keeping images perfectly consistent and saving time in post-production.