 8 minute read
How to Win at Ecommerce Jobs
Ecommerce photo sessions raise unique challenges – but with some expert advice, you can overcome them to achieve an efficient workflow
On ecommerce jobs, you need to combine lighting skill with more efficient ways of working. The task is to photograph 80 to 100 different looks in a single day, while keeping the quality high, and editing minimal. You could be taking anywhere between 15 and 30 frames per look. Multiply that by the overall number, and it’s 3,000 images at the end of the session.
To make that happen, we need an indestructible workflow. Everybody should be clear on the mission – from the model, to the art director, to any assistants you have. Then, it’s just turn and burn through the photo list.
How to Get the Best Out of Your Models

Photo 2022 © Ab Sesay | FUJIFILM GFX100S and FUJINON GF110mmF2 R LM WR, 1/125 sec at F11, ISO 100
These sessions are all about moving the train down the tracks as efficiently as possible. So, pick a model who doesn’t need to be steered or directed. Someone who can just hit a range of poses. Ideally, it should be something like, ‘three exposures in the front, smile, don’t smile, three from the side, lifestyle pose, fake walk, fake walk, jump…’ and then you’re on to the next outfit. You should only need to direct something very specific, otherwise you’ll lose your voice before long.
You will be led by your client’s needs, age, ethnicity, and so on. But a key factor is someone who needs very little retouching. Have them send photos before the session, and if outfits include bare legs, for example, check they don’t have bumped knees. Retouching scuffs in 3,000 photos must be avoided.
Create Simple, Effective Lighting
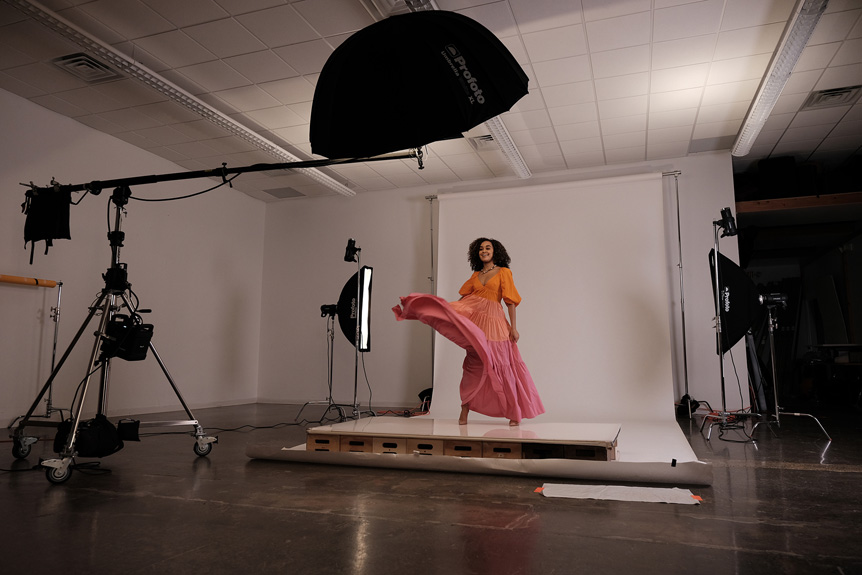
This setup is designed for consistency and to show products clearly. It’s similar to the big-volume lighting used in Chapter 3. The lights create a sweet spot for the model to work in, while illumination is even, so it doesn’t matter which way they’re facing. It’s catalog-style, but still has character, so not too flat.


Photo 2022 © Ab Sesay | All lights
Photo 2022 © Ab Sesay | Key light
Photo 2022 © Ab Sesay | Background lights
Photo 2022 © Ab Sesay | Key and edge lights
Photo 2022 © Ab Sesay | Edge and background lights
There are five lights in total: two edge lights; two lights pointing at the ceiling; and a key light angled from above the camera. The edge lights are fitted with 3ft Profoto stripboxes, adding accents, but also lighting the background. The unmodified lights blasting at the ceiling bounce the effect around, washing over the background to brighten it. The key light is fitted with a Profoto Umbrella XL, which adds definition amid the soft fill. The background is about half a stop overexposed against the subject, so it’s close to a pure white.
Even Simpler Ecommerce Lighting
If you only have one light, great ecommerce results are still possible. Here, I used a one-light setup, just as described in Chapter 3. Get the light up high, far back, and a little to the side of the subject. It lights evenly, but with a shadow that creates depth, and gives the appearance of sunlight.
You can either opt for no modifier at all, or something that gives moderate focus. I went with a Profoto Magnum reflector, which has a spread of about 50º. Here, the light is about 5ft behind my camera position and lights a 9ft seamless backdrop with ease. If you’re in a small space and can’t get the light back that far, use a wider modifier, or set the flash’s zoom to its widest.
Keep It Consistent
No matter how you’re setting up, consistency in light and color is vital. With the sheer number of frames, you can’t afford to right wrongs in post-production. Once the lights are placed and metered, set your white balance to that of the flash output and don’t touch a thing. That alone will save a lot of time, as any minor alterations can be batched. Make note of light positions and power using your flash meter, so you can quickly replicate the look when a client asks for the same next week.

Photo 2022 © Ab Sesay
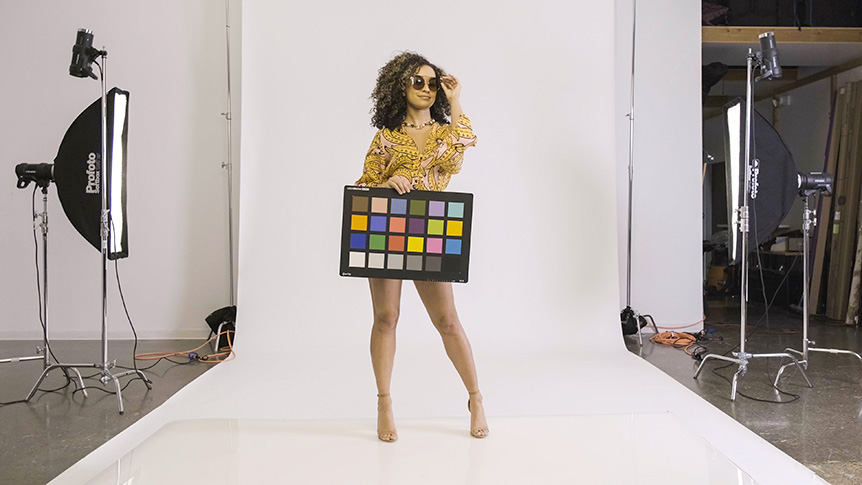
I photograph a color checker alongside each new outfit, which only adds 15 minutes to a ten-hour day. I can use this in post-production if required, and it also gives some defense against clients who question an image. If they say a garment’s color isn’t accurate, it may be because they’re used to looking at it under fluorescent or tungsten light, compared to the daylight balance of studio lighting.
If there is a discrepancy, I can show my due diligence. From a client management point of view, it really helps in addressing the emotional side of those situations. A color checker is also useful if someone else, like an assistant or another photographer, is finishing a session for me. So, if there’s user error – such as accidental changes to exposure via the aperture – I can fix it using the reference.
Add Quality to Your Kit
Consistency also comes from the light quality. Pro flash heads have great consistency in color temperature, while lesser models will shift color between power settings – and even individual exposures. That’s a nightmare for ecommerce projects, so invest in flash with ratings like ±150 K across the range, or ±20 K from flash to flash. Flash tubes near the end of their life can affect color, too.

Photo 2022 © Ab Sesay | FUJIFILM GFX100S and FUJINON GF110mmF2 R LM WR, 1/125 sec at F11, ISO 100
Camera and lens choice, alongside the position you photograph from, also define success. I use a single prime lens – a GF110mm F2 R LM WR here – and compose from a tripod, marking its position on the studio floor, in case it needs to be reset. It’s not about sharpness, but consistency. If framing and focus don’t change, editing will be easier. Here, everything is exposed at F13, with the focus locked to the model’s position. And with GFX100S, I’m using a very high-resolution camera, so I can easily extract smaller details from the full-res files as close-ups.
Build Success into Your Set
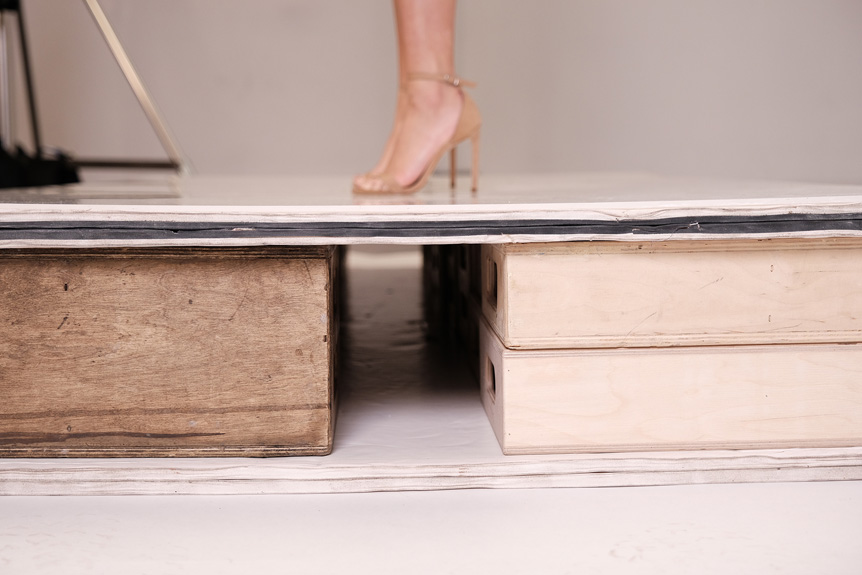
Clever set design also makes a session more efficient. Here, the model is standing on a white Plexiglass sheet, built on a riser. This helps with high-traffic sessions, because whereas a paper roll or painted floor would get covered in marks – that you’d need to paint over or edit out later – Plexiglass can be wiped or polished between looks, keeping it bright and clean. We also have a sticky mat for the model to walk on before the sheet.
Add Products to Your Ecommerce Game
On an ecommerce project, you’ll often have clients ask you to photograph accessories, as well as full outfits. You don’t need to be a still-life specialist to do this. Yes, it’s easier on a separate day when you’re not working with the model, but if a session has downtime – like when there’s a hair and makeup break – take advantage.
Remember, we’re not doing complex lighting, with separate exposures or focus stacking – as we might on an editorial or advertising job. Images should be pretty, but it’s more forensic, so you just need it to be clean and accurate to the product, without too much fussing. Take particular care with color – use a checker to make sure hues are true.
The product needs to be clean and tidy without imperfections, because you don’t want to spend time retouching. A good tip is plastic rods to arrange the product if needed, so you don’t leave fingerprints. And expose, so the depth-of-field covers it completely, because customers will want to see what they’re buying in full focus.
Simple Product Lighting Setup
You can place products within either of the main lighting setups detailed above, or if you have the space, a smaller secondary area along similar lines. The examples here show both. In the sunny look, it’s a simple case of adding products into the existing setup, with some fresh paper backing. Again, the shadow gives it depth, keeping the look consistent with the main images which the client will like.
The second setup, on white, has a similar wraparound style to the main model image, but is constructed differently. Here, I used a 4x3ft softbox, arranged low behind the product and angled down onto it at 45º. With a reflector placed opposite the softbox, very soft light is created, but we also put a small black card to keep a little more definition.
Speed Up with Tethering
Tethering to a monitor or laptop means I can get the art director or buyer stuck to that screen, approving images on the fly. And if I can send over images already selected by a client, it saves hours. Some clients are going to want images at the end of the day, and if I’m tethered, I can have my digital tech assistant backing up, organizing, renaming, and processing them to meet that need.
Tethering is also a safety net, because there’s a second pair of eyes on each image – I would champion it for that reason alone. With the volume of photos, any slips can be tough to spot, so having someone calling out on accidental exposure changes, blinkies, or even a missed focus can save time and trouble.
Manage Your Photo List
If you’re considering 99 pieces in a day, it’s easy to miss something, but a thorough list of required images will make sure you don’t. Pay attention to naming conventions and, with a little prep, you can name each image with its SKU or catalog number. Begin the filename with that, and end it with a short description, like ‘red hoodie’. Clients will sometimes specify what’s required, too. Finish a session with everything lined up nicely by name, and you’ll never go back. The opposite often means you’ll have hours of extra work to do.
In the next article, we’ll tie together many of the topics from previous tutorials into a conceptual project for a client, showing how to light for impactful color and get the range of images required.


