
Lens accessories of firmware update steps
The procedure below is explained with the combination of a camera and a mount adapter (without a lens).
And the current version is “1.00” and the updated version “1.10”.
1. Prepare the necessities for the firmware update.
- A camera and a mount adapter to be updated
- A fully charged battery
- A formatted memory card
- The firmware (to be downloaded from this site.)
2. Firmware version checking procedure.
- Turn off the camera and put the card in it. Put the card in the camera.
- Turn on the camera pressing “DISP / BACK” button of the camera to check the firmware version. (In the pictures below, the version of the flash is “1.00”.)
- Turn off the camera
If the version is the latest, the firmware update is not required.
3. Prepare the formatted memory card.
A formatted memory card is required for the firmware update. If the card is formatted, all the files including protected files in the card will be erased. If you need the files, copy them to a PC etc. before formatting the card.
- Turn on the camera.
- Press “MENU/OK” button and select “FORMAT” in the SET-UP menu.
- Press the selector button(up) to select “OK” and press the “MENU/OK” button. Then, the format will start.
Turn the camera off after the format is completed.
- Turn the camera off after the format is completed.
4. Download the firmware and copy it to the card.
- Put the formatted memory card to a card reader slot of your PC.
- Download the firmware “GFAC0001.DAT” for the mount adapter.
- Click “I Agree-Begin Download” after you have read “License Agreement” to proceed to the download page.
- Check if there is no file with the same name in a destination of the firmware to save. If there is a file with the same name, a browser can automatically change the name of the firmware and a camera cannot recognize the firmware correctly.
- If you don’t know the steps to save the firmware, refer to the steps below.
Procedure for Firmware Download on Windows OS
Procedure for Firmware Download on Mac OS
- Copy the downloaded “FPUPDATE.DAT” file to the card.
- Take the card from the card reader slot after the copy is completed and put it to the camera.
5. Put the card with the firmware in the camera and update it.
If the firmware update fails, the camera and mount adapter cannot work well. Make sure to follow the two things below.
- Use a fully charged battery. If the camera and mount adapter turns off during the firmware update, it won’t work well.
- The time for the firmware update varies depending on the capacity of the firmware, but it is approx. 60 sec.
Never turn off the camera and operate it during the firmware update.
Once the firmware has been updated, some data of the previous version cannot be restored.
- Turn the camera on while pressing “DISP/BACK” button to show the display in the right (current version is 1.00). Then, press the “MENU/OK” button.
- Select the item into [ACCESSORY – MOUNT ADAPTER] by pressing [down button] in the selector to update the mount adapter.
- Follow the screen below to update the firmware.
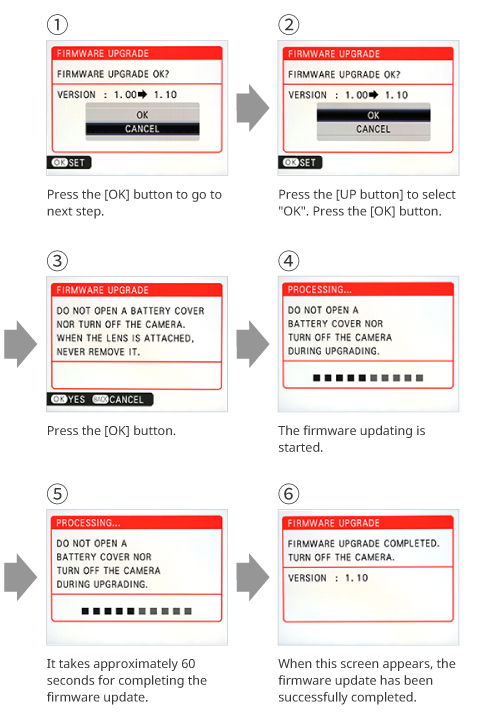
- Turn the camera off. Check the upgraded firmware. By following the above procedure “Firmware version checking procedure”, you can see the firmware version.
- The media used for the firmware update should be reformatted before you use it for taking pictures again.
If you don’t know the steps to update the firmware, refer to the steps below.
Procedure of Firmware updating by Video
※Troubleshooting
Please check here if you encounter any problems


