 4 minute read
8-Bit or 10-Bit? Video Color Explained
Find out how to get the best quality video from your X Series – and how to pick the right option for your recording
Whether it’s stills or video you’re creating, it’s good to know how to get the best image quality. After all, it’s always annoying when you’ve framed a great moment on film only to find it doesn’t look quite as clear or striking as you thought.
Just as with stills, there are various levels of quality to choose from. In video, there are different levels of image quality, too. In the case of your X Series camera, this partly comes down to a choice of recording in either 8-bit or 10-bit mode.
But what do these settings really mean? How much difference do they make to the quality of your footage? And how do you set them up when required? We take a look at it all right here.
What Does 8-Bit and 10-Bit Quality Mean for You?
One of the factors that determine quality of an image – stills or video – is color depth or bit depth. They’re the same thing. This is simply a measure of how many shades and colors it’s possible for the camera to record and, all other things being equal, the more colors there are, the more nuanced and higher quality the footage can be.

You’ll also see 4:2:0 and 4:2:2 written alongside 8-bit and 10-bit settings. This describes the method of processing color in the recording, and the 4:2:2 setting is more accurate as it samples more colors from the scene. However, the latter takes greater processing power, so is more limited in its availability and how it can be recorded, and also creates larger file sizes. The 4:2:0 option is fine for most situations where you won’t need to do a lot of manipulation in post-production.
How Does 10-Bit Color Improve Quality?
All images recorded by a digital camera are made up of red, green, and blue color information, and it’s how these color ‘channels’ mix that creates a full color picture. So, when the camera is set to record in 8-bit video mode, it can capture footage with 256 levels of each color. This means a potential of more than 16.7 million colors.
If you switch the quality setting to 10-bit video, you’ll then be recording 1024 levels of color in each channel and this means the potential for just over a billion different colors.
But it’s worth mentioning that there’s nothing wrong with 8-bit color. In fact, it’s the mode used across almost all of the video you see displayed on your TV or online.
When Should You Pick 10-Bit Over 8-Bit?
The thing is, most viewing devices – be that your TV, computer monitor, smartphone, or anything else – will only display an 8-bit signal anyway, and even if you play 10-bit video on them, it’ll look just the same. So, what’s the point of 10-bit video?
Really, it’s all about getting extra control and quality when editing. The greater the number of colors available, the more aggressively you’ll be able to edit the brightness, contrast, and color in the footage without it losing quality. So, whereas an adjustment to the sky in an 8-bit video might end up showing banding – strips of solid color that should look smooth – 10-bit footage has the extra information required to fill these ‘gaps’.
If you’re a stills photographer, you’ll notice a similar difference when editing JPEGs and RAWs. JPEG files will break apart more quickly than RAW files when their data is pushed and stretched as you alter the color and contrast, because they contain less color information.

Photo © Justin Black
What Are the Restrictions of 10-Bit Video?
On some X Series cameras, you can record 10-bit video directly to the cards in the camera, but only in the 4:2:0 format. If you want to record better quality, which is 10-bit 4:2:2, you’ll need to connect the camera to an external recorder via the HDMI port.
The higher quality of 10-bit video also means the files it creates are comparatively larger than 8-bit videos, so they take up more space in storage and more processing power when editing. The extra quality can be worth it, but only if it’s required in your workflow.
How to Find the Settings You Need
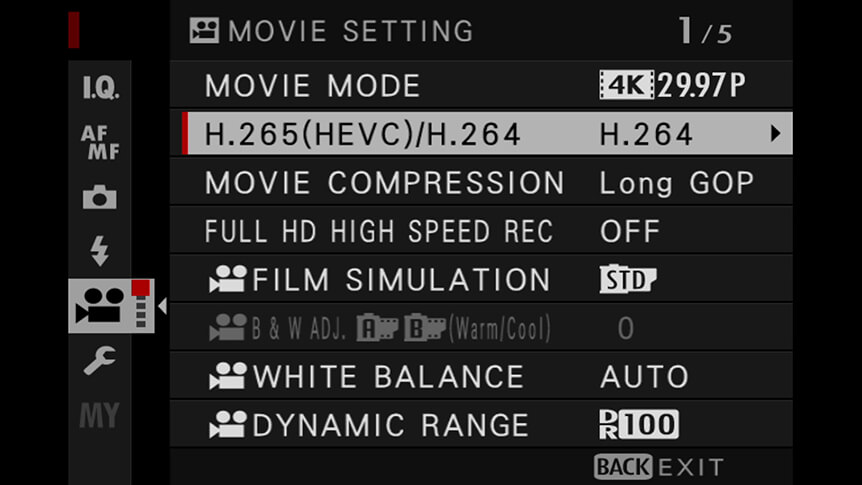
In the MOVIE SETTING menu, find the H.265(HEVC)/H.264 option and scroll right. Here, you can pick between H.264 that lets you record 8-bit 4:2:0 video to the internal cards, and 10-bit 4:2:2 to an external recorder. These terms refer to something called the codec, which is the method of image compression. Pick H.265(HEVC) and you can record 10-bit 4:2:0 video to the internal cards and 10-bit 4:2:2 video to an external recorder.


