


Photo © 2023 Irina Logra
Quick Start Guide: Camera to Cloud
Contents
What is Frame.io Camera to Cloud?
Frame.io Camera to Cloud securely transmits still and video files directly from the camera and stores them in the cloud. These can then be shared with others for review and commenting in real time and reduces overall production and collaboration timelines. Fujifilm is the first company to offer a native digital stills camera integration for Adobe Camera to Cloud, via Frame.io. It is currently available for both FUJIFILM X-H2 and X-H2S.
The technology has multiple applications across a variety of genres. A wedding photographer, for example, can transfer all their files to an image editor as the wedding progresses, then have edited files ready to purchase in an online gallery by the evening reception. Or a sports photographer can send images of the action as it happens to a newsdesk, ready for sharing on social media or online.
This type of workflow has already been adopted by the video industry, where smaller (proxy) files are sent to a video editor, who can begin to edit footage, then update it with the original file later.
Frame.io Camera to Cloud will change the way you create images and video, streamlining processes and ensuring you never lose another file. This Quick Start Guide details how to get started with selected Fujifilm products.
Hardware and Software Requirements
Frame.io Camera to Cloud is currently available for FUJIFILM X-H2S and X-H2 users. Both cameras also require the FT-XH File Transmitter grip, an active internet connection and a Frame.io account. All hardware must have the latest firmware:
X-H2S FW4.00
X-H2 FW2.00
FT-XH FW2.00


• To update the firmware on the body, make sure you have a formatted memory card and a fully charged battery, then:
• Download and install the latest firmware for X-H2 or X-H2S to your computer from HERE
• On your computer, copy the file to the memory card, then insert the card into the camera
• Press and hold the DISP/BACK button, switch the camera on
• After a few seconds the FIRMWARE UPGRADE screen will appear
• Select BODY and then follow on-screen instructions until complete
• Download and install the latest firmware for FT-XH HERE
• The same process applies to update the firmware on the FT-XH grip, but choose GRIP on the FIRMWARE UPGRADE screen
• An active Frame.io account is required for Camera to Cloud functionality, see the Frame.io website for details and pricing, where you can also try it out for free for seven days. It is also available to Adobe Creative Cloud users with Premiere Pro or After Effects.
Once active the Frame.io application can be accessed via web browser, iOS app for iPhone and iPad or Apple TV* app.
*Available to Enterprise users only
How Do I Get My Camera to Connect With Frame.io?
There are multiple ways to get connected. For simplicity, we’d suggest using a WiFi network, or using your phone to either tether to or connect via a hotspot.
Connecting to a WiFi network


Connecting to WiFi with a password
• Press MENU/OK and scroll to the NETWORK/USB SETTING menu
• Select Frame.io Camera To Cloud, followed by CONNECT, then WIRELESS LAN
• Choose ACCESS POINT SETTING > MANUAL SETUP > SELECT FROM NETWORK LIST
• The camera will display a list of nearby WiFi networks, choose your preferred network and input the network password, followed by SET
• When the REGISTRATION COMPLETED message appears, press MENU/OK, then FINISH


Authenticating and Pairing
• Now open Frame.io on your web browser or app, go to C2C Connections, then select Add New Device
• On the camera select GET PAIRING CODE and on the browser click Device Ready to Connect.
• Input the pairing code from the camera’s LCD into Frame.io, before selecting Authorize and Finish. After a few seconds, the connected camera will appear in the C2C Connections list on Frame.io.
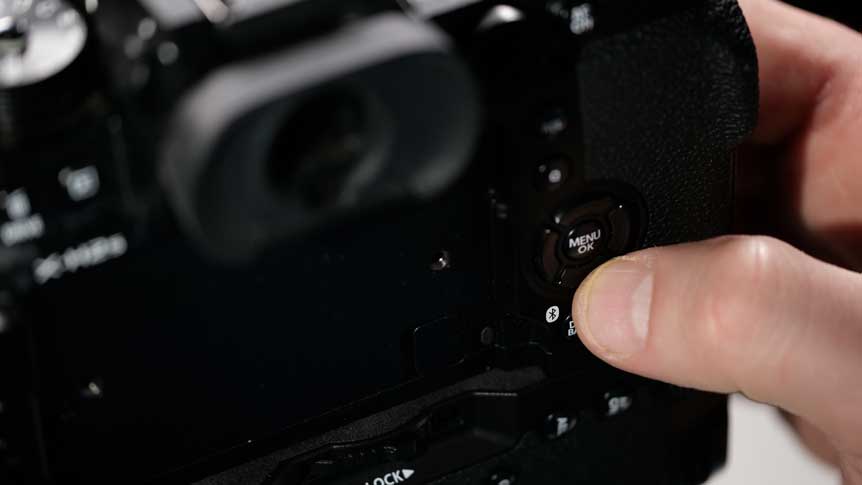
Every time you turn the camera on within range of the same network, it will connect within a few seconds. A red light on the grip flashes initially, then turns green to confirm an active connection.
If you wish to connect to a different WiFi network, repeat the steps above. NOTE: The camera will always remember the last network you connected to. It is also possible to connect to a router via WPS or SSID
Connecting via a phone hotspot
Before you start, make sure your phone’s hotspot is active. On an iOS device this is done via the Settings menu. Choose Personal Hotspot and make sure the Allow Others to Join option is switched On. On an Android device go to Settings > Connections > Mobile Hotspot and Tethering. Once active, follow these steps:


• Press MENU/OK and scroll to the NETWORK/USB SETTING menu
• Select Frame.io Camera To Cloud, followed by CONNECT, then WIRELESS LAN
• Choose ACCESS POINT SETTING > MANUAL SETUP > SELECT FROM NETWORK LIST
• The camera will display a list of nearby WiFi networks, choose your phone hotpot and input the password, followed by SET
• When the REGISTRATION COMPLETED message appears, press MENU/OK, then FINISH
• Now open Frame.io on your web browser or app, go to C2C Connections, then select Add New Device
• On the camera select GET PAIRING CODE and on the browser click Device Ready to Connect.
• Input the pairing code from the camera’s LCD into Frame.io, before selecting Authorize and Finish. After a few seconds, the connected camera will appear in the C2C Connections list on Frame.io.
NOTE: If you have previously connected via a WiFi network and paired the camera with Frame.io, you will not need to repeat the process when connected via a phone hotspot. You can use the same process to connect to a portable network
Tethering to a smartphone
It is also possible to connect via USB smartphone tethering with both Android and iOS devices. Note: The cabled connection should be made between the cellphone and the FT-XH File Transmitter grip using the USB-C port marked ‘MOBILE’ – do not connect to the USB connector on the camera.


For Android:
• Connect the cable to the grip and the smartphone, then go to the Frame.io Camera to Cloud menu, followed by CONNECT and select USB SMARTPHONE TETHERING.
• On your smartphone, a notification window appears. Tap this window for more options and the USB Preferences window will appear. Make sure ‘This device’ is selected under ‘USB controlled by’ and choose ‘USB tethering’ under the ‘Use USB for’ options.
• The camera will generate a pairing code to complete the connection.
For iOS
• Connect the cable to the grip and the smartphone, then go to the Frame.io Camera to Cloud menu, followed by CONNECT and select USB SMARTPHONE TETHERING.
• On your smartphone a ‘Trust this Computer?’ prompt will appear. Select ‘Trust’.
• The camera will generate a pairing code to complete the connection.
Strategies for Success
The NETWORK/USB SETTING menu on FUJIFILM X-H2 and X-H2S provides additional controls over how files are uploaded once you have a Camera To Cloud connection. These are as follows:


Choose which type of file is uploaded
• Press the MENU/OK button, navigate to NETWORK/USB SETTING and choose Frame.io Camera to Cloud
• Now choose SELECT FILE TYPE. Scroll through the list and press the MENU/OK button to select/deselect the files types you would like to upload
• Once chosen, press the DISP/BACK button
Choosing which files are uploaded, and when
Depending on how you want to work with Frame.io Camera to Cloud, you can choose how and when files are uploaded. If you’re in a studio environment with a stable WiFi connection, for example, you could connect and then upload files as they’re made. However, if you’re on location with no signal, or an unstable cellular network, it may be better to wait until you get home to upload. Here’s how it’s done:


To upload files as they’re made
• Press the MENU/OK button, navigate to NETWORK/USB SETTING and choose Frame.io Camera to Cloud
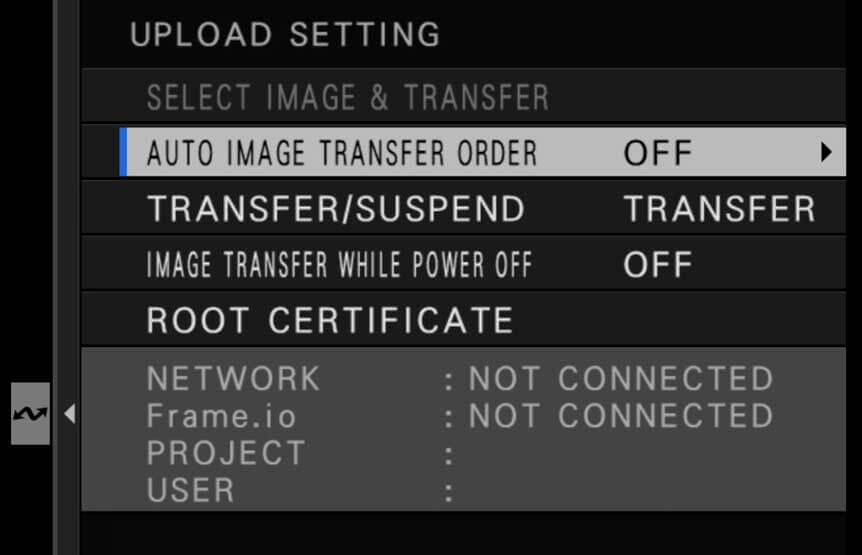
• Now choose UPLOAD SETTING and AUTO IMAGE TRANSFER ORDER
• Select ON and press the MENU/OK button again to confirm settings
As long as you have an active network connection, files will be transferred as they’re made

To upload selected files
• Make sure you’re connected to Frame.io.
• Press the MENU/OK button, navigate to NETWORK/USB SETTING and choose Frame.io Camera to Cloud
• Now choose UPLOAD SETTING and first check that AUTO IMAGE TRANSFER ORDER is set to OFF
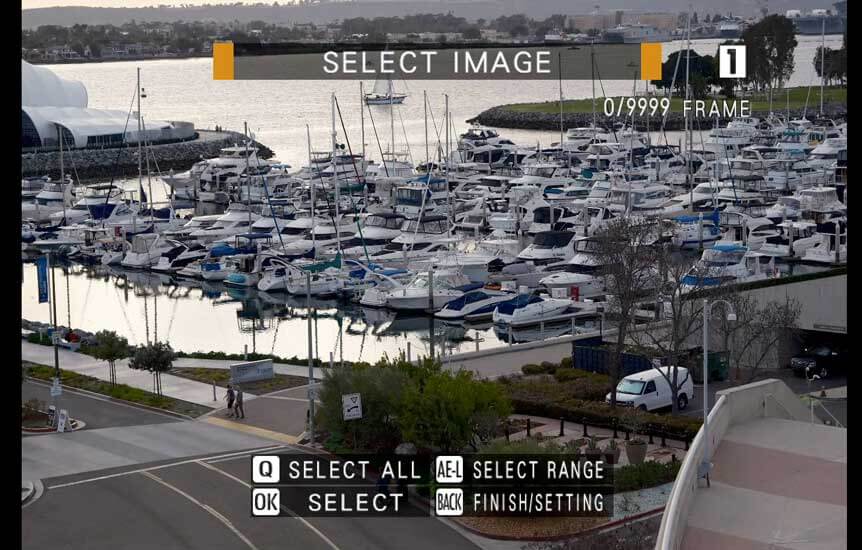
• Go to SELECT IMAGE & TRANSFER. You can now scroll through the files on your memory card and either select them all (press the Q button), select a range (press the AE-L button) or select individual files (press the MENU/OK button).
• When the desired files are selected, press the DISP/BACK button, then choose START TRANSFER and the files will transfer.
Assign the ISO button to transfer
If you want to avoid going through menus to select and upload files, you can assign the ISO button and simply select files to upload during playback. To set up the button:
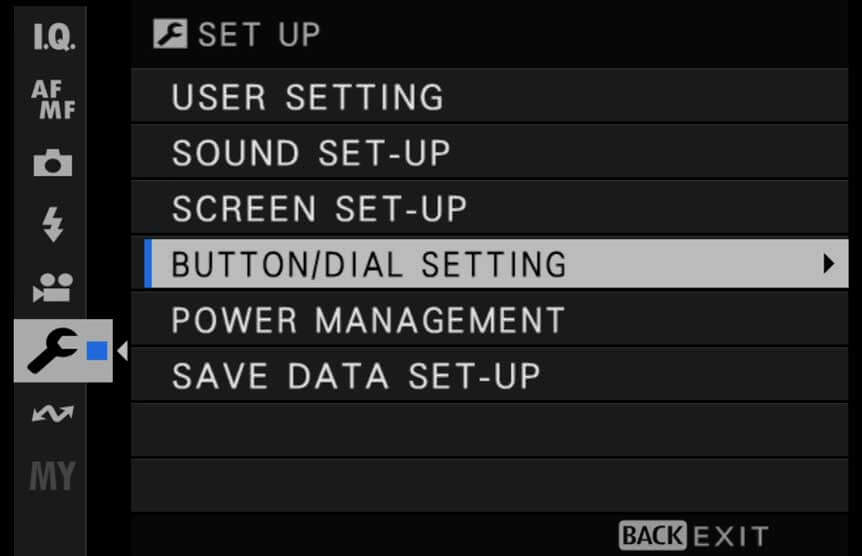
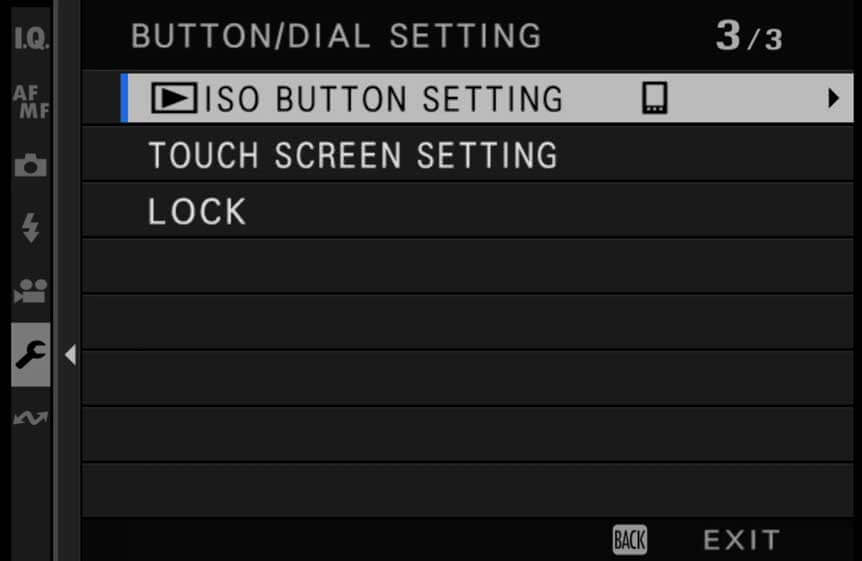
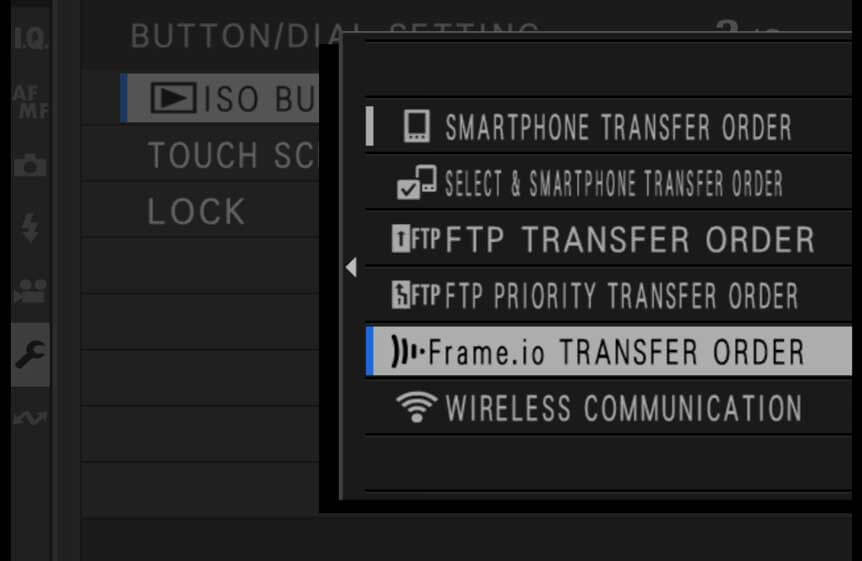
• Press the MENU/OK button, navigate to SET UP and choose BUTTON/DIAL SETTING
• Scroll to the third page of the menu and select ISO BUTTON SETTING, then Frame.io TRANSFER ORDER, press MENU/OK to confirm


Once the button is assigned, uploading is simple.
• Make sure you’re connected to Frame.io
• Press the MENU/OK button, navigate to NETWORK/USB SETTING and choose Frame.io Camera to Cloud
• Now choose UPLOAD SETTING and check that AUTO IMAGE TRANSFER ORDER is set to OFF
• Now, press the PLAYBACK button and scroll through your files. When you find the file(s) you want to upload, press the ISO button and Frame.io TRANSFER ORDERED will briefly appear on the rear LCD. The file(s) will then be transferred.
Basic Frame.io Functionality
Once your files have been transferred into Frame.io, you can get them organized and start collaborating via web browser or iOS app. The range of features varies between the two, with the web browser option offering greater flexibility.
Using Frame.io via a web browser

Organizing files and folders
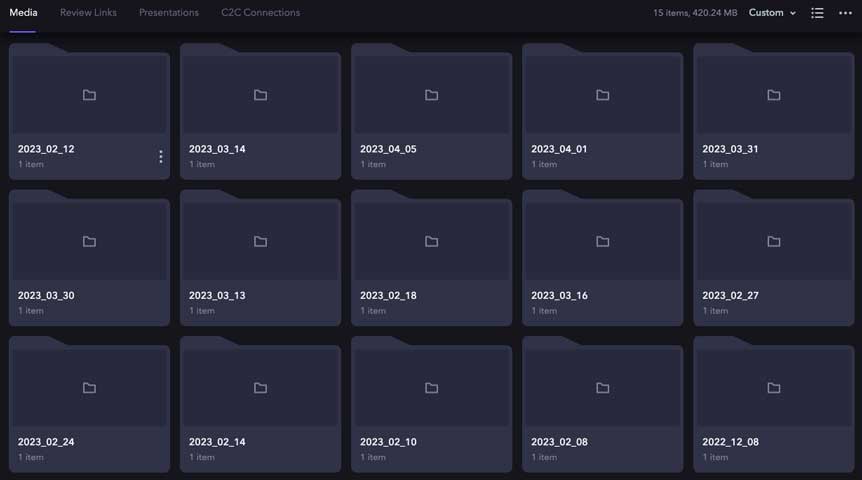
By default, files are uploaded into date folders on Frame.io. Once uploaded, they can be organized quickly and easily.
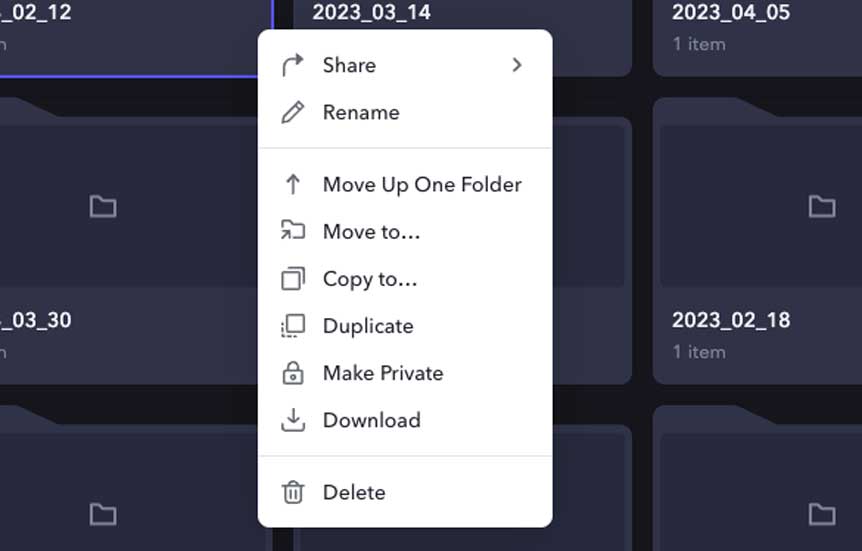
Make sure the Media tab is selected, then hover the cursor over the folder and three vertical dots will appear, click on the dots once to access the range of options, including renaming, moving and downloading.
Do the same on an individual file and you’ll be able to set a status – Needs Review, In Progress, Approved or No Status


To create a Review link
Collaborating on files and projects is done via the Review tab. The recipient does not need a Frame.io account themselves.
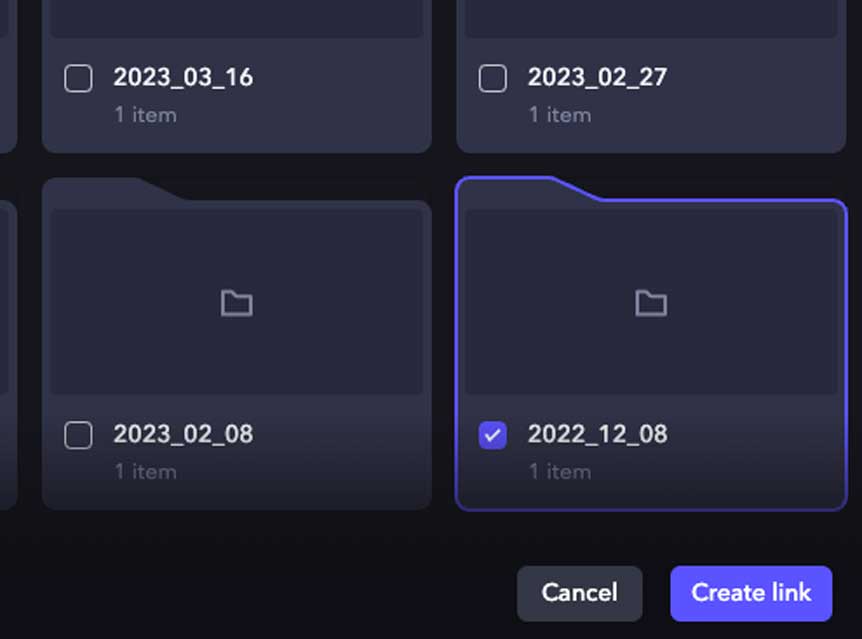
• Click the Share button on the top right corner of the web browser window and choose Share for Review
• Select the folder or files you wish to share, then hit the Create Link button in the bottom right of the frame.
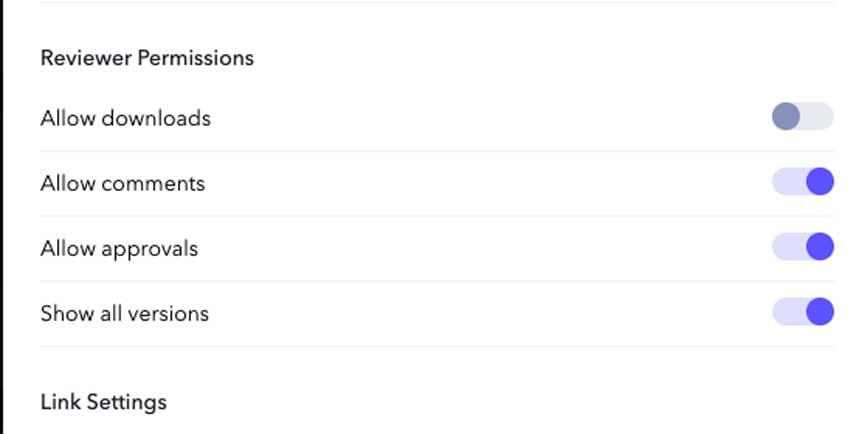
• In the window that opens, give the link a name, then go to the Settings tab and select the permissions you’d like the reviewer to have.
• Finally, go back to the Settings, input the reviewer’s email address and any message and, then select Add
NOTE: If you would prefer to share files for viewing or downloading, this can be done via the Share as Presentation option.
Find more information on sharing links for review HERE
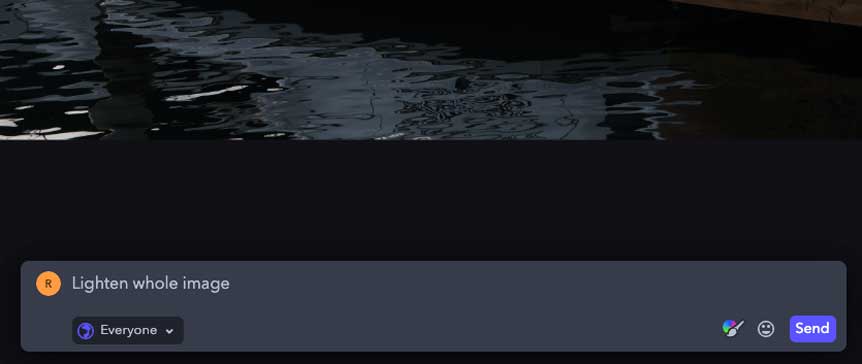

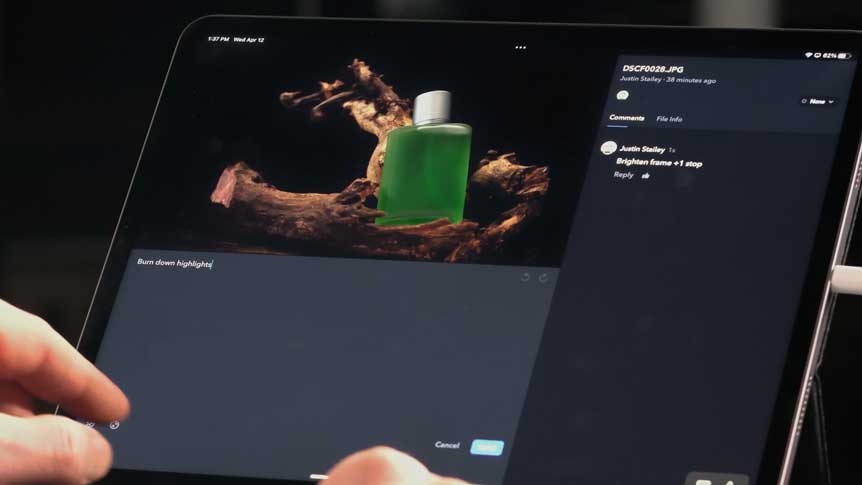
Commenting on files
To read and post comments on files, navigate to the relevant file, then double click it to open. The Comments panel appears on the right hand side where all comments are housed, while adding your own comments is done via the window at the bottom of the screen.
If you want to highlight a specific part of an image, click on the brush icon in the same window and select the appropriate tool to highlight the area before adding a comment. Video files can be scrubbed through to find the precise frame before comments are added.
Comments from other collaborators can be replied to and marked as complete using the window on the right, plus it’s also possible to delete and edit your own comments here.
Using Frame.io via iOS app

Organizing files and folders
By default, files uploaded via C2C are organized into date folders on Frame.io. Once uploaded, they can be organized quickly and easily via the ‘Projects’ tab.
Within ‘Projects’, make sure Media is selected, then tap the three horizontal dots to access the range of options, including renaming, moving and deleting.
Sharing a folder
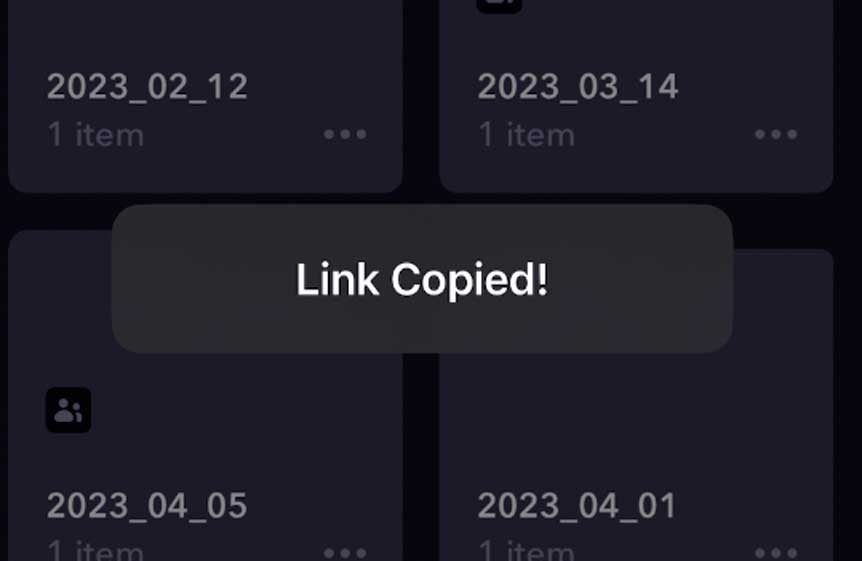
Collaborating on files and projects is done by copying and sharing a Resource Link.
In the Projects window, tap the three horizontal dots on the folder you want to share, then tap Copy Resource Link. This can then be pasted into an email or message to send to a collaborator.


Commenting on files
To read and post comments on files, tap the Home icon, then tap the thumbnail on the file you want to access. To add your own comment, tap the panel at the bottom of the screen and type.
If you want to highlight a specific part of an image, click on the brush icon in the same window and select the appropriate tool to highlight the area. Video files can be scrubbed through to find the precise frame before comments are added.
You can also reply to comments from other collaborators in this window as well as set a status for the file – choose from – Needs Review, In Progress, Approved or None.
When you’ve completed commenting, swipe down to go back to the Home page
For more details on how to connect Camera to Cloud with Frame.io please go HERE