10 minute read
Get the Most Out of Your Histogram
Ever wondered how to make full use of your histogram or what directly affects it? Be it the luminosity or RGB histogram, technical specialist Christopher Gilbert expands upon the process of using your histogram to its full potential
As an educator, I often get asked what my favorite camera is and I never really have a solid answer. It’s not necessarily a specific camera, but an entire ecosystem that I fell in love with. I’m sure all of us have done the same thing. We’ve gone through different brands, types, and levels of cameras trying to find the perfect one that fits the needs of our style and technique.
While I can say that the FUJIFILM X100S and FUJIFILM X-T1 were my first ventures into the X Series digital camera lineup, it wasn’t until the FUJIFILM X-T2 came out that I confidently fell in love – everything just felt right on that camera. It took me 15 years to find the right one and now I’m here with the fourth and fifth iteration of those models and I can say I’m still impressed with all the tools it provides me with to improve my process of framing landscapes.
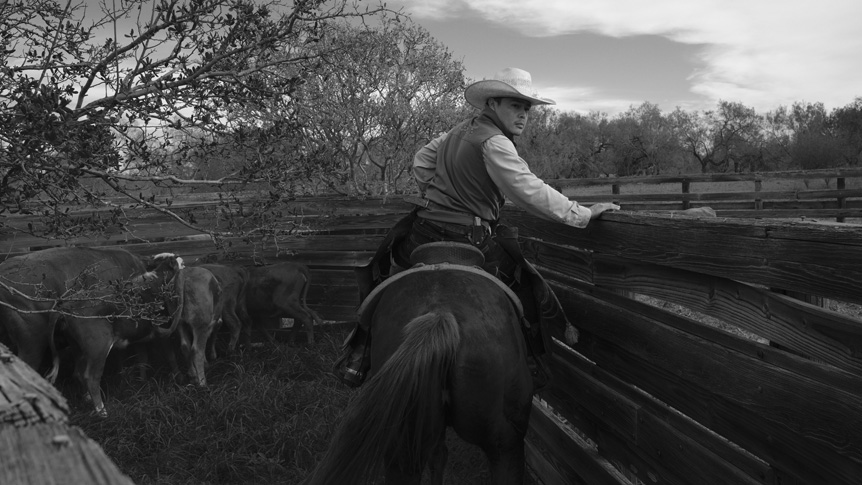
Photo © Christopher Gilbert | FUJIFILM X-T1 with FUJINON XF16mmF1.4 R WR, 1/90th sec at F7.1, ISO 800, Velvia Film Simulation
I gave up the 35mm format for a camera that’s a tool, not a toy, and it’s another question that I get often. Why did you give up full-frame for a smaller sensor? There are many reasons – some go beyond just the cameras themselves. However, the underlying reason – and the purpose of this article – is the features within X Series (and GFX system) cameras that makes my time creating images simpler. I’m able to stay present and enjoy the scenery that unveils before me. While the histogram isn’t specific to FUJIFILM cameras by any means, I find the layout and size very useful. I’ve seen them in all shapes and colors – find one that works for you and find out why this works for me.
Set Up
Using your histogram isn’t exactly a secret, there are dozens of tutorials out there showing you what it means and providing you with the theory of how to use it, so I’m not going to go in-depth as far as what the luminosity histogram is, because you can already find a bunch of resources. I am, however, going to talk about a few things that are rarely mentioned and explain how I use the histogram in X Series and GFX system cameras depending on what file type I’ve set, or more specifically, RAW or JPEG.
Luminosity histogram location

Luminosity histogram (example 1)
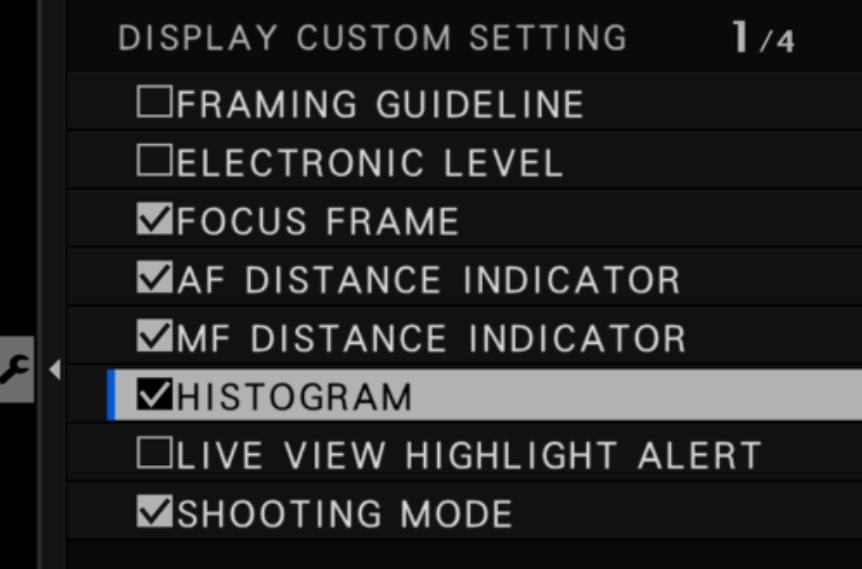
The luminosity histogram is straightforward and if missing from your screen, can be added by doing the following:
MENU OK > SET UP > SCREEN SETTING > DISP. CUSTOM SETTING > HISTOGRAM
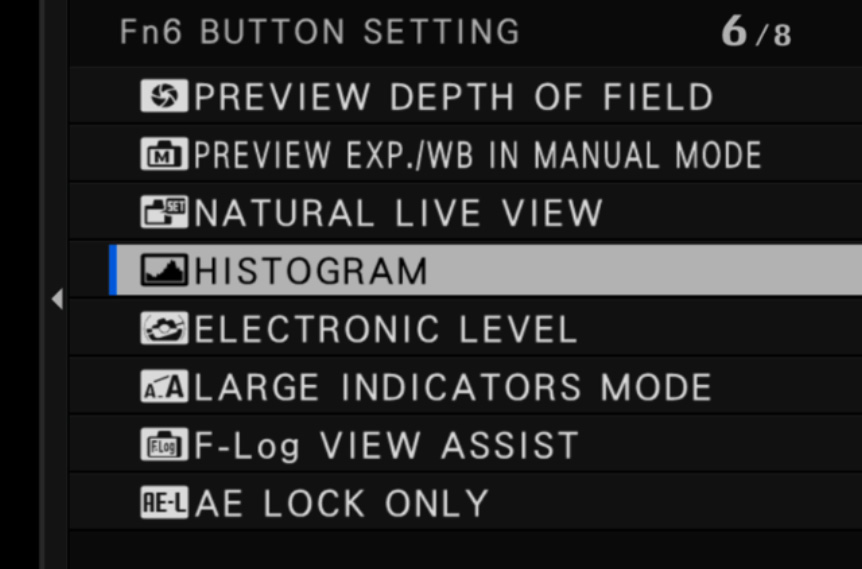
The reason I keep saying luminosity histogram is because you actually have two options: the histogram pictured in example 1 that’s toggled in the Custom Display Settings and the other, shown in Example 2 (below), that can be set to a function button (hold DISP BACK for three seconds on most X Series cameras and the Function (Fn) Setting Menu will pop up. You can assign the option to whichever button you like).
Luminosity and RGB histogram location

Luminosity and RGB histogram (example 2)
There are several ways these are different, which will be obvious to you when you try both methods. One is strictly for brightness of pixel, which is what everyone is used to, and the other gives four independent histograms that will be overlaid on a majority of the screen. This will be your luminosity and RGB histogram (shown while you are in live view, by the way). The luminosity histogram shows blacks, shadows, mid-tones, highlights, and whites – just like what you’re used to.
The RGB histogram is a readout of the color distribution from your sensor, depicting the additive colors of red, green and blue separated into individual graphs. Combinations of these colors give you every color the camera can perceive. You’re going to read it very much like the luminosity histogram – too far in any direction and the end result is the loss of information that can’t be recovered. The ability to see the breakdown of all the channels, rather than seeing them averaged together, gives you the ability to inspect – to a further extent – whether you’ve ‘blown’ out information in your image and an exposure adjustment is needed.
An example of when this is helpful would be during fall when I’m photographing the ever-changing colors of the trees. If I look at the luminosity histogram by itself, everything might appear correctly exposed, but if I look at the RGB channel, I might have a major spike to the right in the Red channel, so I should back off my exposure a bit. This is only necessary depending on your file type. Let me explain…
Application
When I’m set to JPEG, this information isn’t as important to me and I generally just look at my luminosity histogram or just base the exposure/color on what I see on the screen (you should not have your LCD/EVF brightness all the way up or your exposure/color reading could be misleading since the backlight can reveal information that’s not accurate). I’m pushing and pulling the exposure in-camera with the H Tone, S Tone options found in the default Q Menu and choosing the Film Simulation that pleases me. The H and S Tone is typically how I add contrast to the scene.

H Tone affects your highlights in your image – going to a positive will push them toward white and going to a negative will reduce them toward neutral gray.
S Tone affects your shadows – going to a positive will pull them toward black and going to a negative will bring them toward neutral gray.
Use these two controls to have a greater handle over your histogram. Shadows too dark? Put S Tone to a negative. Highlights flat? Put H Tone to a positive.
RAW is another story and it can be overwhelming if you try to focus on everything at once and go down some technical rabbit hole that’s not good for anyone. Let me break it down, and this is the point not a lot of photographers talk about. YOUR HISTOGRAM IS BASED OFF THE CURRENT JPEG PROPERTIES THAT YOUR CAMERA IS SET TO. If you’re using a contrasty, saturated Film Simulation, your histogram is going to directly reflect that. Did you select a flat Film Simulation that has muted contrast? Yep – your histogram changes. So when you import your file into whatever software you like to use and the JPEG properties are stripped, your histogram now looks completely different, because the RAW processor is interpreting that unfiltered data and presenting it in a way to maximize your editing capabilities.

Natural Live View off

Natural Live View on – notice the change in the histogram
So what do we do about it? Easy, like really easy with the X Series. I toggle between the Natural Live View (MENU OK > SET UP > SCREEN SET-UP > NATURAL LIVE VIEW) setting being on and off. Turning the Natural Live View on, reduces the impact the Film Simulation mode has on the histogram, so it’ll mirror more closely what it’ll look like when you import it into your editing software. Having NATURAL LIVE VIEW turned OFF will allow you to see the impact of your Film Simulation and any changes you made to the H/S Tone options. Keep in mind that this just affects the image preview, your final image will still have the Film Simulation applied to it. Long story short – RAW ON, JPEG OFF. If you think you’re going to reapply the Film Simulation in post, I might just fine-tune by using the H and S Tone to match what the histogram looks like upon import. This is going to require a little bit of experimentation on your part, but I usually find on the FUJIFILM X-T4, I bring my H and S Tone to -.5 when I’m working with Capture One.

Photo © Christopher Gilbert

Photo © Christopher Gilbert
Photo © Christopher Gilbert
Photo © Christopher Gilbert

Photo © Christopher Gilbert
Now that you have this information, what’s the practical use for it? Besides just displaying the information on the screen and giving me a general range of my exposure and color information. You can use it to control the amount of noise in your image, because you can see how far the image can be pushed to the highlights/whites area of your histogram.
Expose to the Right (ETTR)
Besides sounding like a robot from the future, ETTR is a technique I use when I want to maximize the dynamic range of my camera. The technique goes like this: you use your histogram (in Natural Live View now that we know about it) and intentionally overexpose your image to the point where you don’t lose any highlight information that you want to keep. It’s okay if you blow out the sun a bit – the sun is really bright, so don’t spend too much time trying to balance the entire scene with it, because you’re not going to get too far.
Once you’ve made your image and have brought it into whatever post-processing application you prefer, you can reduce the exposure and bring down the highlights a small amount. The theory is that you do not have to raise your shadows in post-production as much, so you’ll have far less noise in the areas of your image where you’d normally have to recover. In short, bringing up the exposure in your shadows yields far more noise than bringing down the highlights in your image.
Keep in mind that this is where your RGB histogram becomes very important – the luminosity histogram might look correct, but you’ll need to verify that you don’t have any clipping in any portion of the color histogram or you’ll have muted colors when you go to reduce your highlights or bring down your exposure. Bright, contrasty days will be the enemy of this technique unless you use a filter to control your highlights. Typically when I’m photographing midday, I’m in covered areas or looking for shapes in shadows to add interest when I’m using the ACROS Film Simulation.
Wrap Up
Oh my, there was a lot here – I appreciate you sticking with me. Hopefully you pulled out some helpful information that doesn’t pull you from the scene and you’re able to enjoy the time you’re out there creating. These techniques make it easier to do that – at least for me. I have the ability to get my exposure ‘spot on’ typically and have a better knowledge base of how to control my histogram when I really need to. As always, there isn’t a right way to do something, and what works for me, might not work for you. But having the choice to try something new may lead you to building a better image.