


Revisiting the Culture and Origin of “Wau Bulan”
Hi, my name is Yaman Ibrahim, a professional FUJIFILM X-Photographer based in Kuala Lumpur, Malaysia. My passion and expertise in photography evolves around the field of travels, documentaries and portraits including the studio shoots which have been my forte for the past few years. I have been given a golden opportunity to use the FUJIFILM X-Pro3 camera for my project of capturing the traditional art of kite making the Wau Bulan (Moon Kite)

X-Pro3 & XF8-16mmF2.8 R LM WR
X-Pro3 & XF8-16mmF2.8 R LM WR

X-Pro3 & XF14mmF2.8 R
In this series, I had the privilege to observe the mesmerizing skills of kite craftsman, putting together a delicate design and touch to produce the well known traditional kite the Wau Bulan of Kelantan Darul Naim an East Coast state in the Peninsular Malaysia.
With FUJIFILM X-Pro3 camera these painstaking process of wau making can be captured in each and every steps where patience and care become the utmost ingredient in producing the most beautifully crafted Wau Bulan.
X-Pro3 & XF8-16mmF2.8 R LM WR

X-Pro3 & XF14mmF2.8 R

X-Pro3 & XF8-16mmF2.8 R LM WR
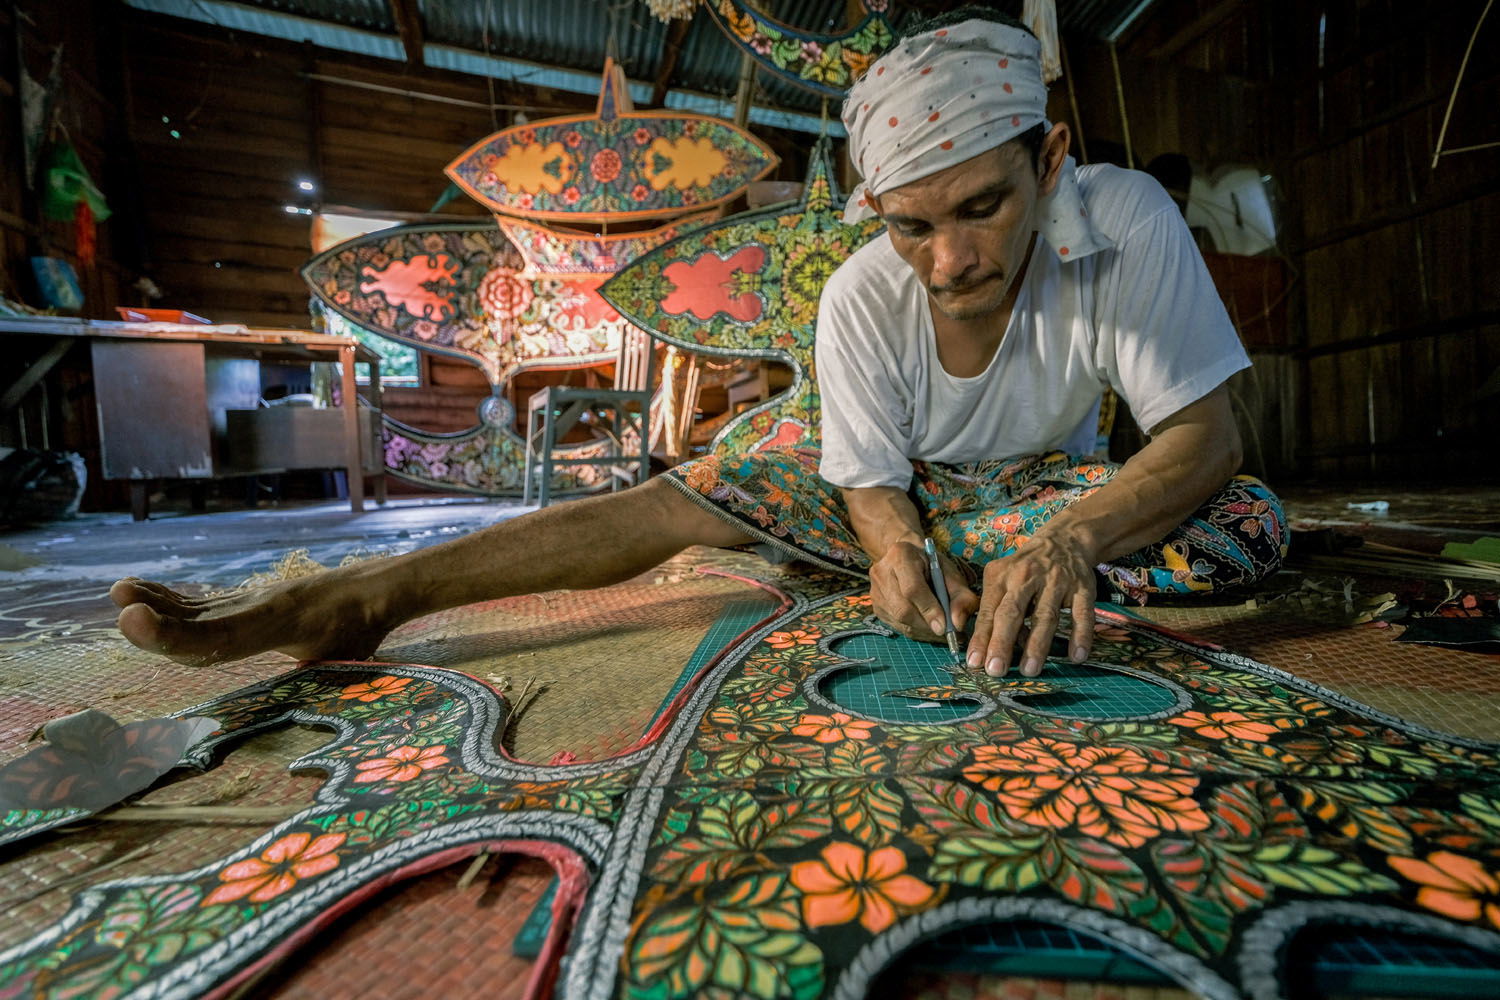
To form the frame of the Wau Bulan, a carefully chosen dried bamboo spines were being used where the spines were shaped by heating them with slow flames allowing the spines to be flexed according to the desired shape. In capturing the whole process, the flip-able hidden LCD screen was really helpful especially when you are doing it from a difficult angle. It provides a great visual perspective of the activities and at the same time allowing me to capture every single steps of it with ease and comfort.
Next would be applying the skin to the frame of Wau Bulan. Special colored papers were used where intricate design of patterns and traditional motifs were carved onto the paper forming an eye catching ensemble. And here The Fujifilm X-Pro3 with hybrid optical and electronic view finder that features a higher resolution, better contrast and brightness and wider color space has allowed me to highlight the traditional color choices in this special kite making with distinct color variation and depth.
The finished Wau Bulan can stand as tall as three meters in height and usually is bigger than any other kites being produced. The Wau Bulan can be distinguished by their elaborated traditional design with combination of colors and detailing by the expert of the kite maker craftsmanship.

X-Pro3 & XF16-55mmF2.8 R LM WR

X-Pro3 & XF16-55mmF2.8 R LM WR

X-Pro3 & XF8-16mmF2.8 R LM WR
Capturing the flight of the Wau Bulan is as breezy as the afternoon wind blowing across the field. With faster frame rate and ergonomically designed shape allow me to focus more on the action in front of me. The Wau Bulan were framed as if it was pegged to the sky majestically emanating spirit of achievement and success.
In expressing my artworks in photography, elements of vibrant and picturesque story telling remain the forefront in my approach towards producing a masterpiece of its own and with FUJIFILM X-Pro3 camera it will canvass it even better. With the retro classic design and shape it is constantly reminding me that being the photographer, creativity and professionalism are the mainstay of the overall outcome while it is working very hard with all the latest optical and sensor technology put together to make it a less obtrusive and yet a full fledge moment capturing tool of the future.

X-Pro3 & XF8-16mmF2.8 R LM WR


