

Part one: working outdoors
What’s not to like about macro (close-up) photography? Getting closer to your subjects and seeing them in greater detail will always appeal, so picking up a few techniques to help you get better at shooting close-ups is always worthwhile. Before we get down to the picture taking, let’s cover the basics.
First, to get the best results, you need a macro lens. This doesn’t mean a lens that has a macro setting, it means a proper macro lens. If you’re thinking this all sounds a bit expensive, don’t worry – macro lenses have plenty of other uses, too, which makes them good value for money. For example, the FUJINON XF60mmF2.4 R Macro lens doubles up as an excellent portrait lens, with its short telephoto focal length and wide maximum aperture. Equally, our XF80mmF2.8 R LM OIS WR Macro lens is also handy for frame-filling portraits, product shots and still life, and it’s engineered to superb standards!
Back to close-up photography: when it comes to macro lenses you’ll often hear the term ‘reproduction ratio’, such as 1:2 or 1:1 (life-size). Put simply, this refers to the size the lens can reproduce what it’s being pointed at. A macro lens that offers a life-size (or 1:1) ratio will reproduce the subject at the same size on the sensor as it is in real life. 1:2 means the subject will be reproduced at half life-size, and so on. The XF60mmF2.4 R Macro offers a 1:2 reproduction ratio and the XF80mmF2.8 R WR LM OIS Macro offers a life-size reproduction ratio.
Now that spring has sprung and flowers are emerging from the ground, we thought a trip to our local park was in order. See what we found to shoot with our FUJIFILM X-T3 and XF80mmF2.8 R LM OIS WR Macro lens:
Step 1: Selecting the right viewpoint

Getting the right viewpoint is the first thing to think about, and this can be done even before you get your camera out of your bag. You’re looking for individual flowers or small clumps that have some room behind them, so you can produce a nice out-of-focus background. You might be better off picking a shaded spot out of direct sunlight, too. And look for somewhere sheltered – you don’t want the wind moving everything around.
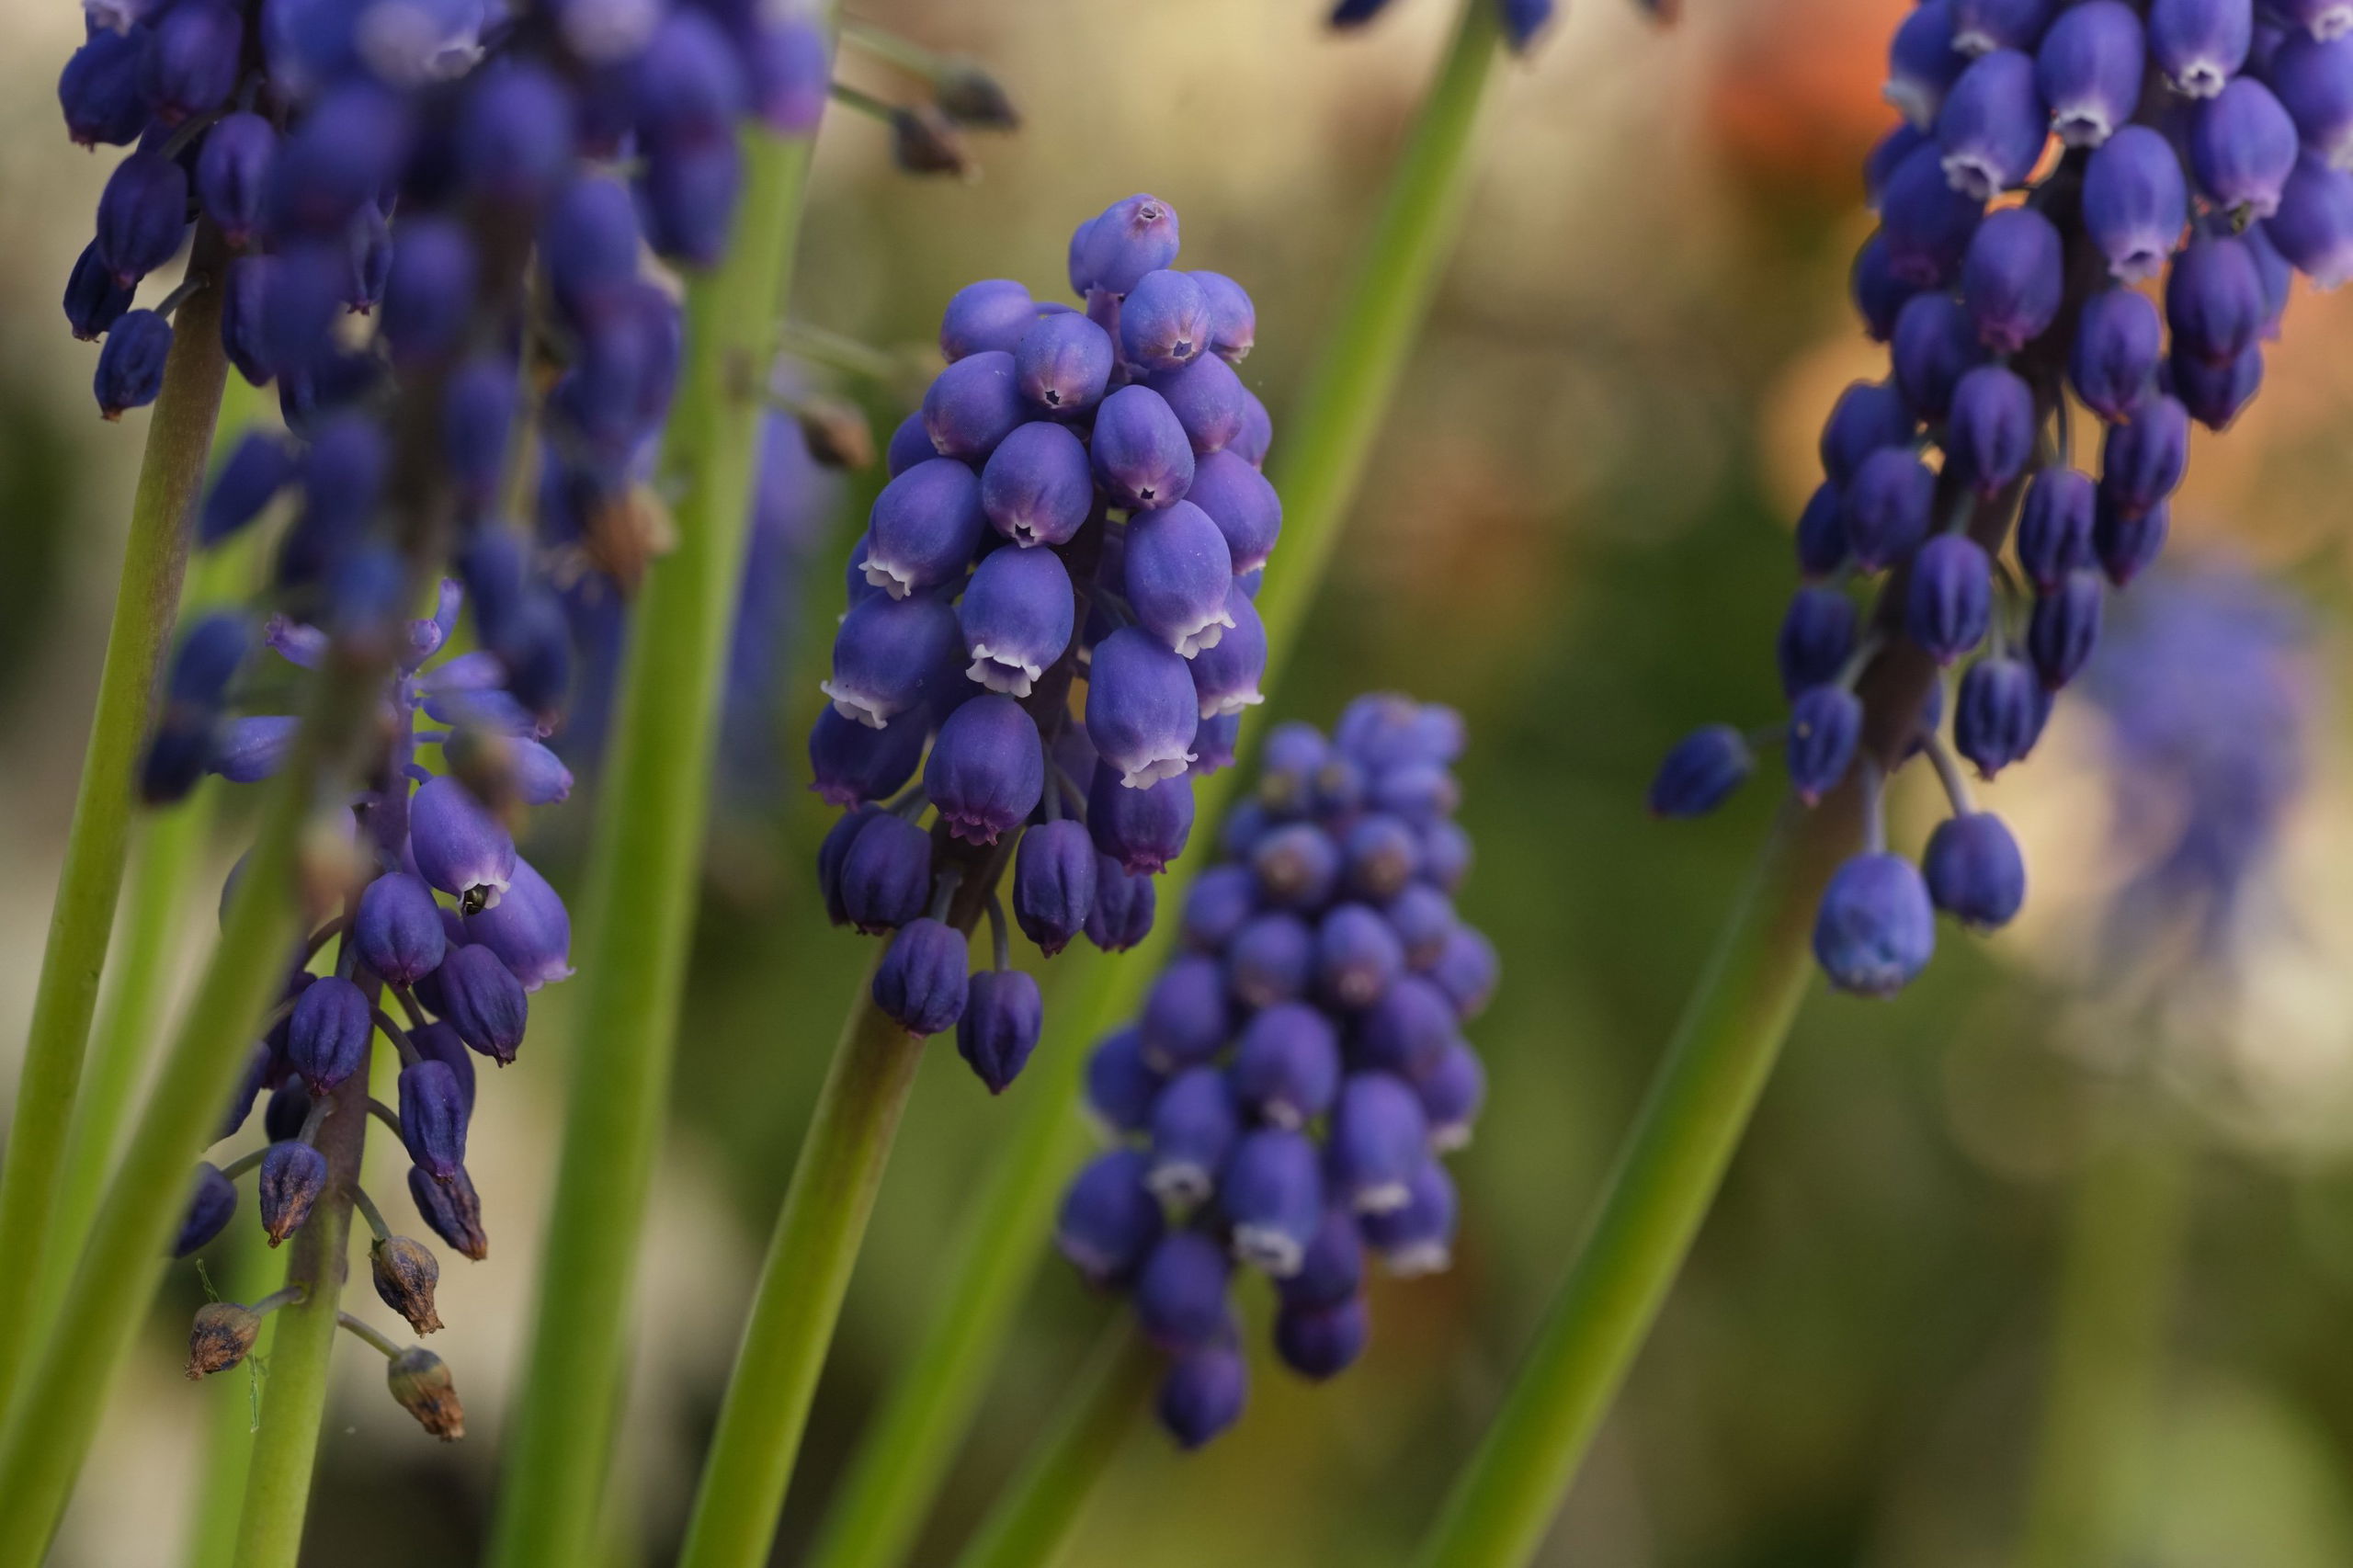
We found a bunch of grape hyacinths that looked great – multiple tiny flower heads grouped together to make a colourful repeating pattern. Although, at just 2-3cm long, they were a challenging subject.
Step 2: The low-down
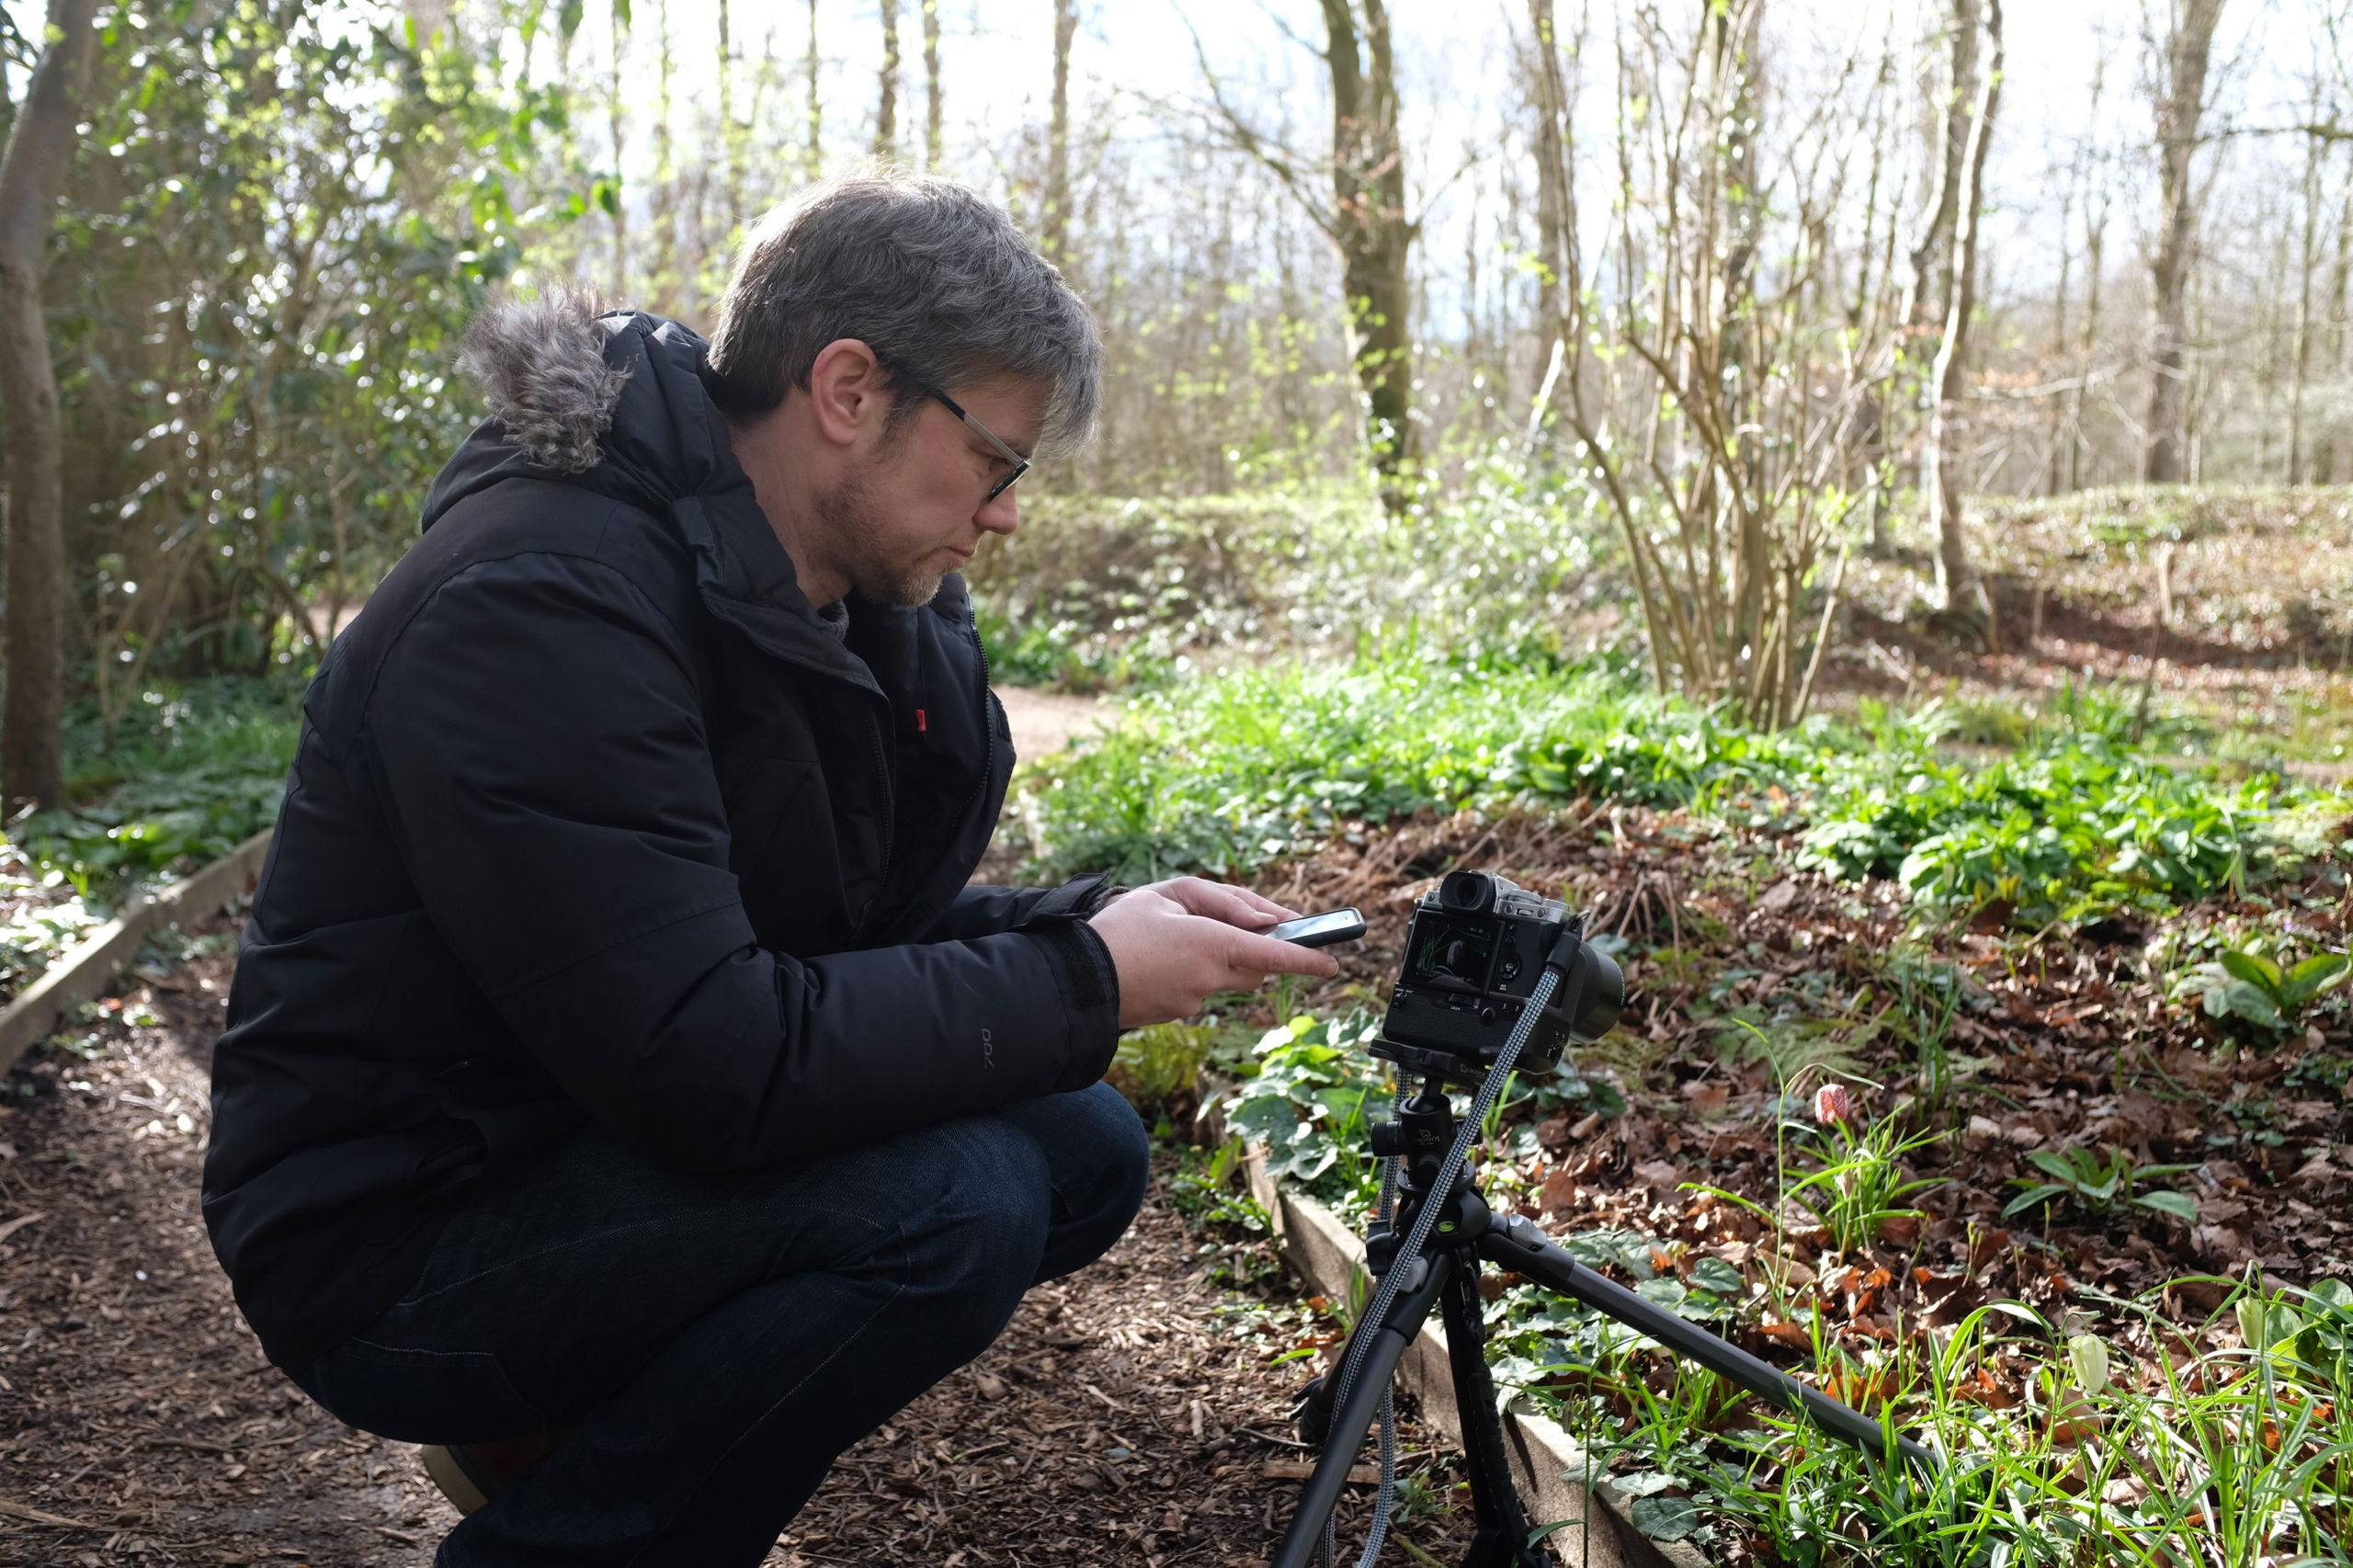
The grape hyacinths were not far off ground level, so we set up using a tripod to get a good composition. Using a tripod is a good idea: it eliminates camera shake even at the slowest shutter speeds and lets you keep the camera in the same position, which is useful for taking control of your composition. If your X Series camera has a tilting or flip-out viewscreen, this is a good time to use it. It lets you shoot from low down, without breaking your back to look through the viewfinder.
You should also think about using a remote release or self-timer to prevent camera shake. We used the FUJIFILM Camera Remote app to trigger the camera without touching it.
STEP 3: Test shot

We used a relatively fast shutter speed of 1/250sec to freeze any slight subject movement due to the breeze. We also manually focused for complete control over where the sharpest point of focus was. After a test shot, the angle and composition looked good, but the light was very hard and high contrast. This can happen when the sun is out; much better light can be found on cloudy days. But all is not lost: try using a portable diffuser to soften the light, reducing contrast and shadows.
Step 4: Softer light
Much better! The diffuser really helped the quality of light, but the background might be a little too in focus. Maybe a blurrier backdrop would isolate the foreground subject a bit better. Do this by opening up the aperture from its current value of f/16.
STEP 5: BETTER BOKEH
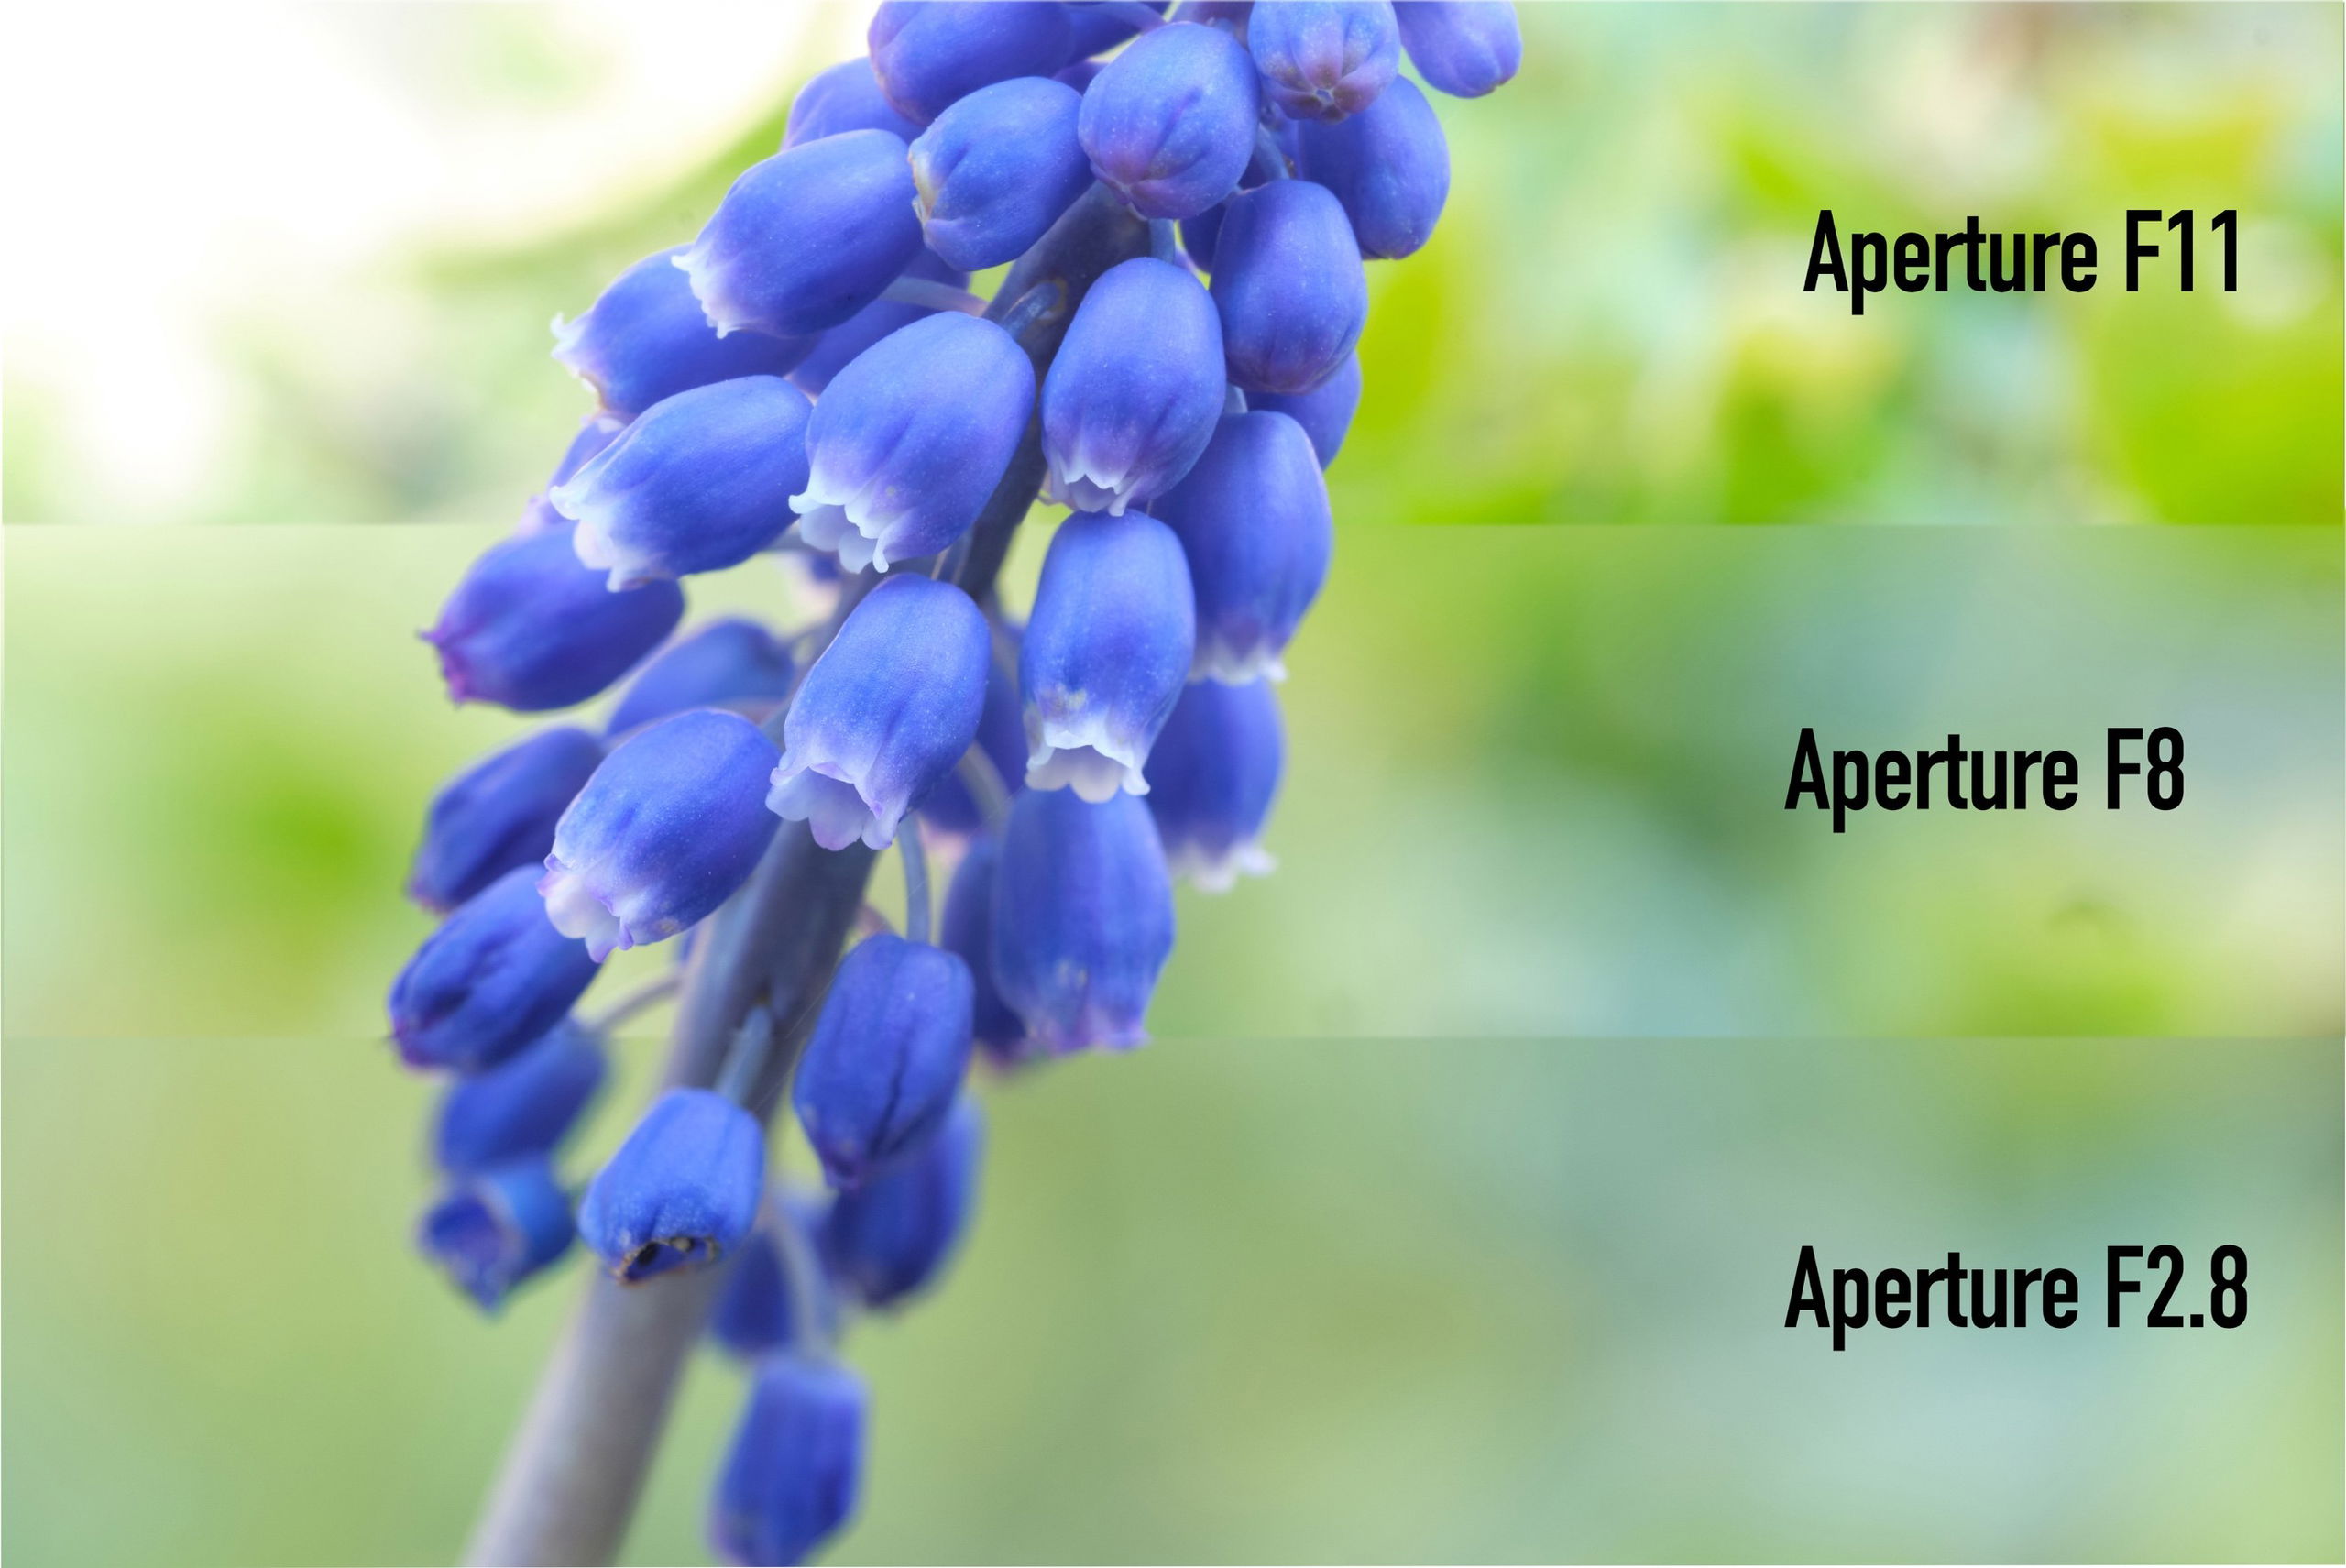
We produced a good balance at f/8. You can still see the background, but it’s soft enough to make the (already sharp) main subject stand out even more. Once you find the right combination of settings, make small adjustments to your viewpoint to get some alternative perspectives, too.
Step 6: Getting in a bit closer
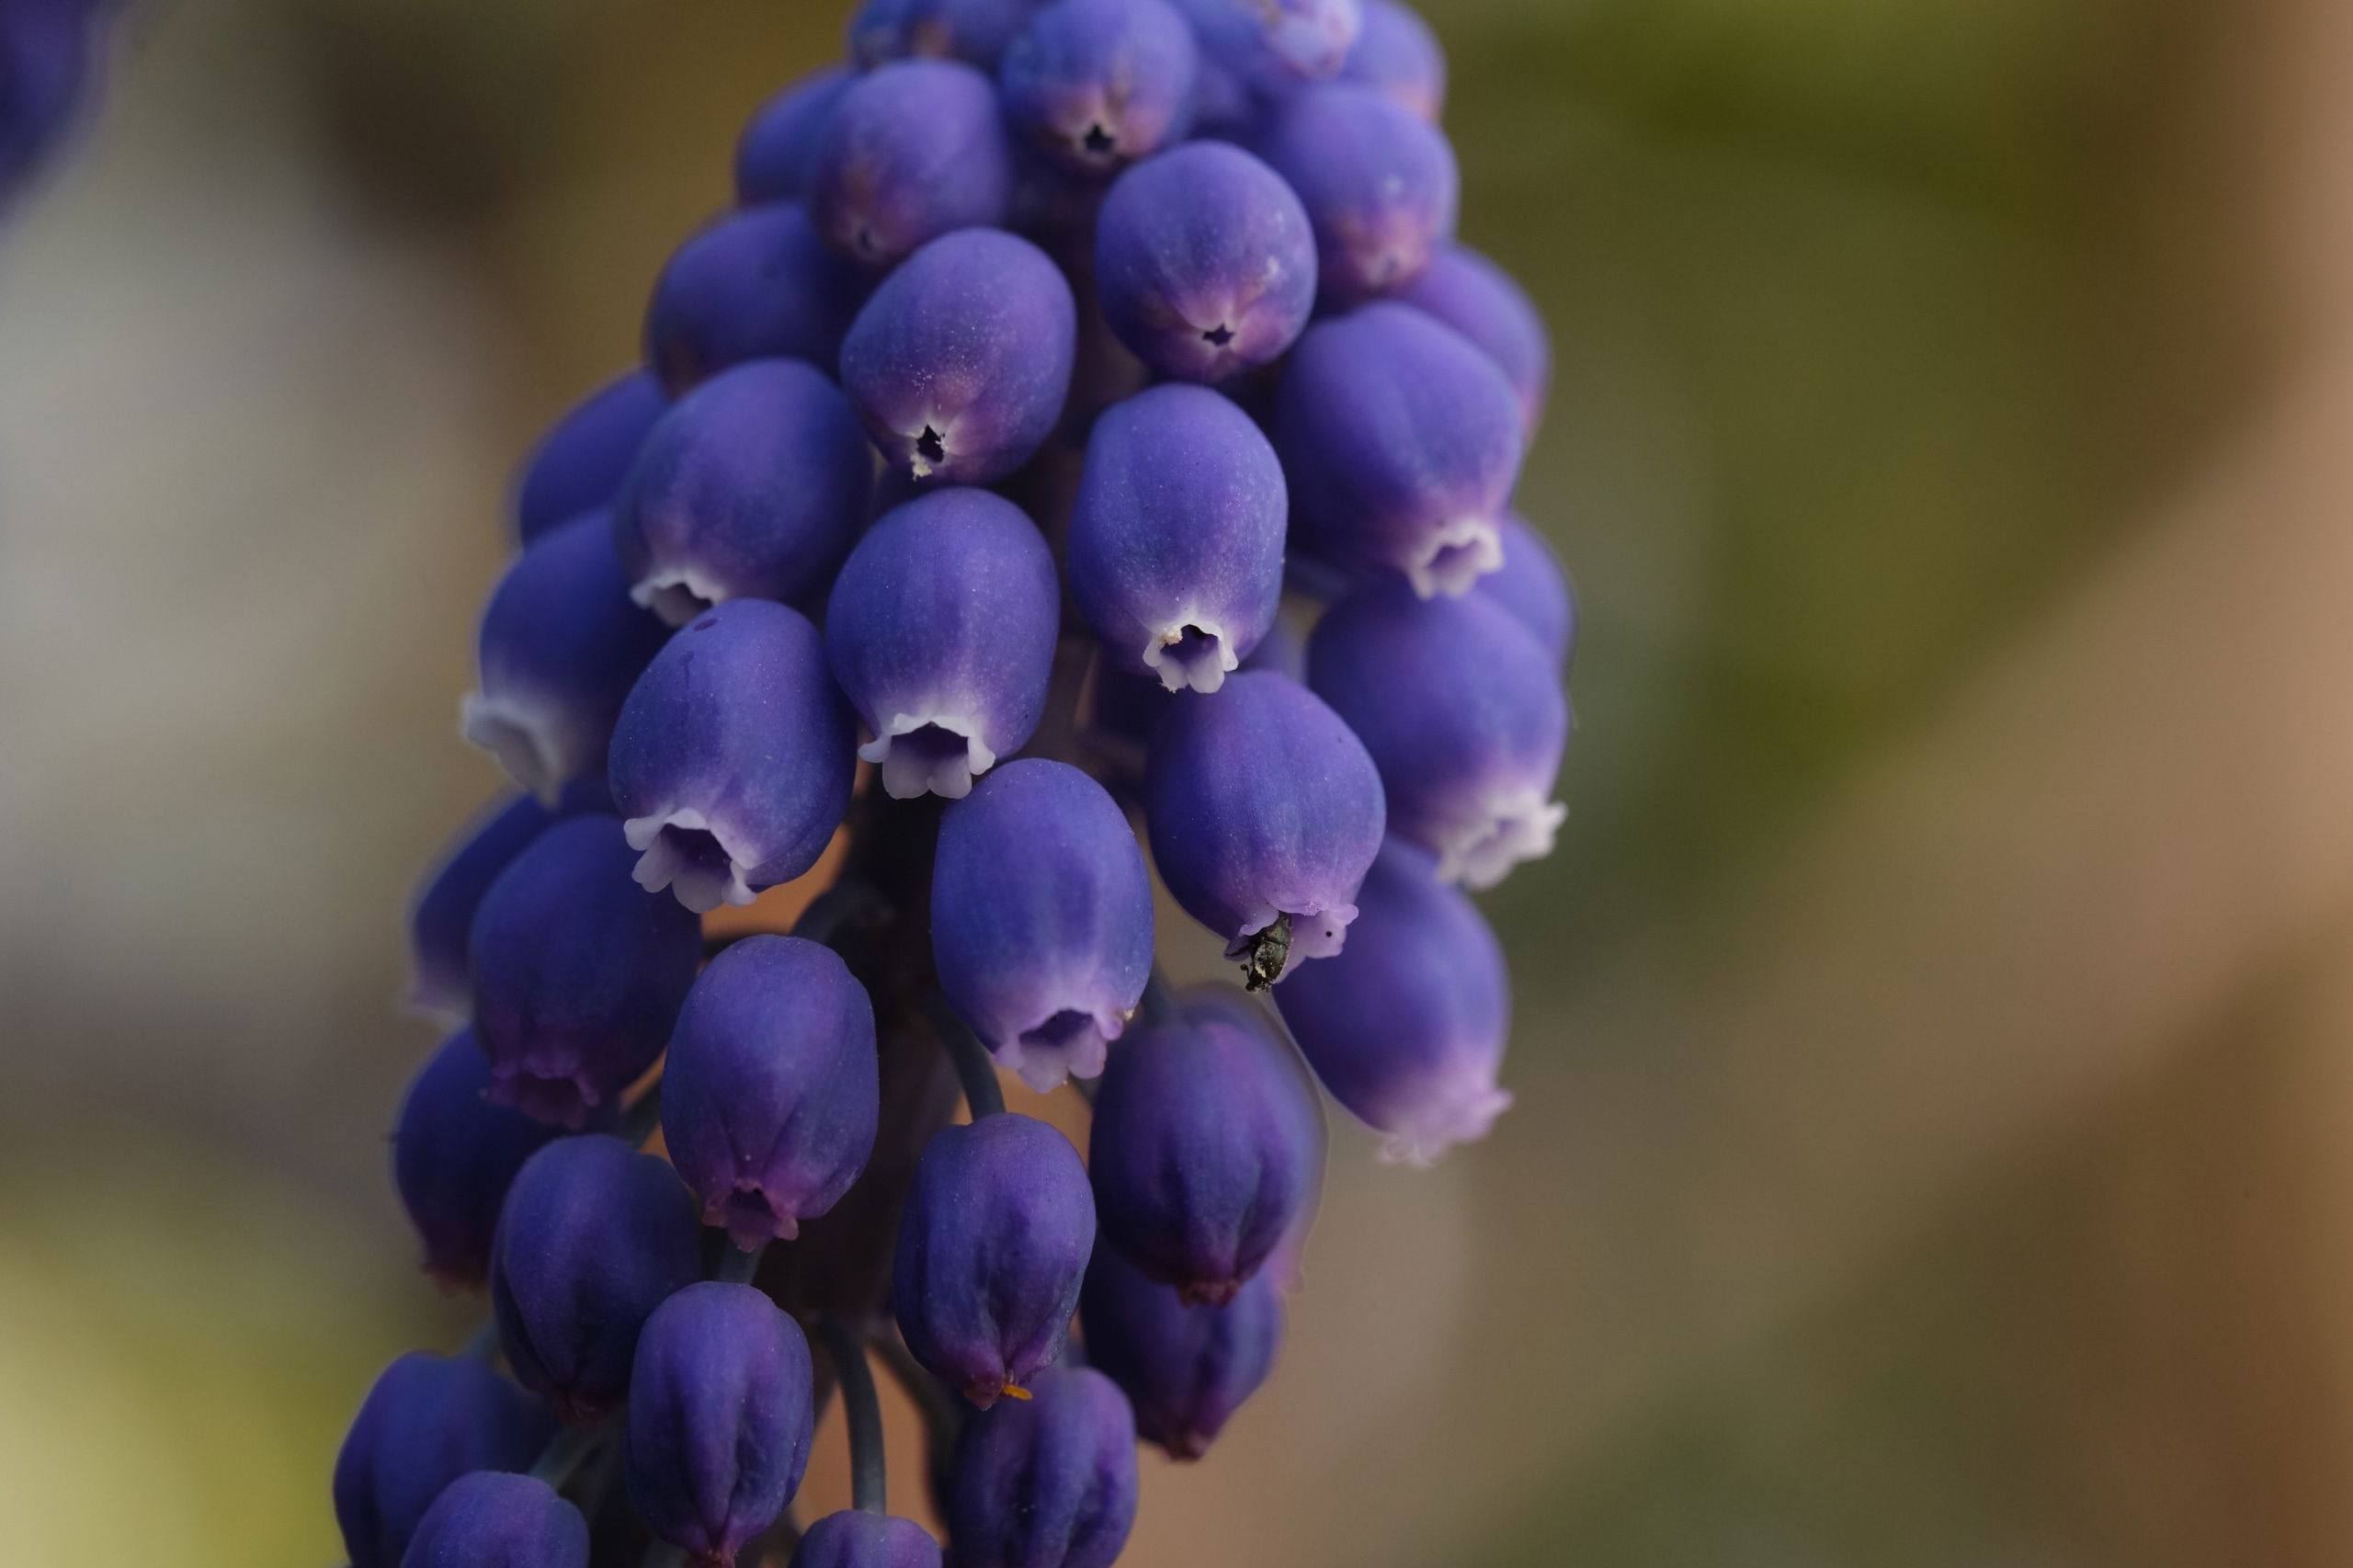
We liked the repeating patterns of the tiny individual flower heads, so we moved even closer, using the extreme close-up abilities of the XF80mmF2.8 R LM OIS WR Macro. We also switched to Velvia Film Simulation mode to produce a deeper, more saturated result, but it was tough to bring out the tonality of the intense purple without underexposing – a common problem when photographing flowers.
Step 7: Using Color Chrome
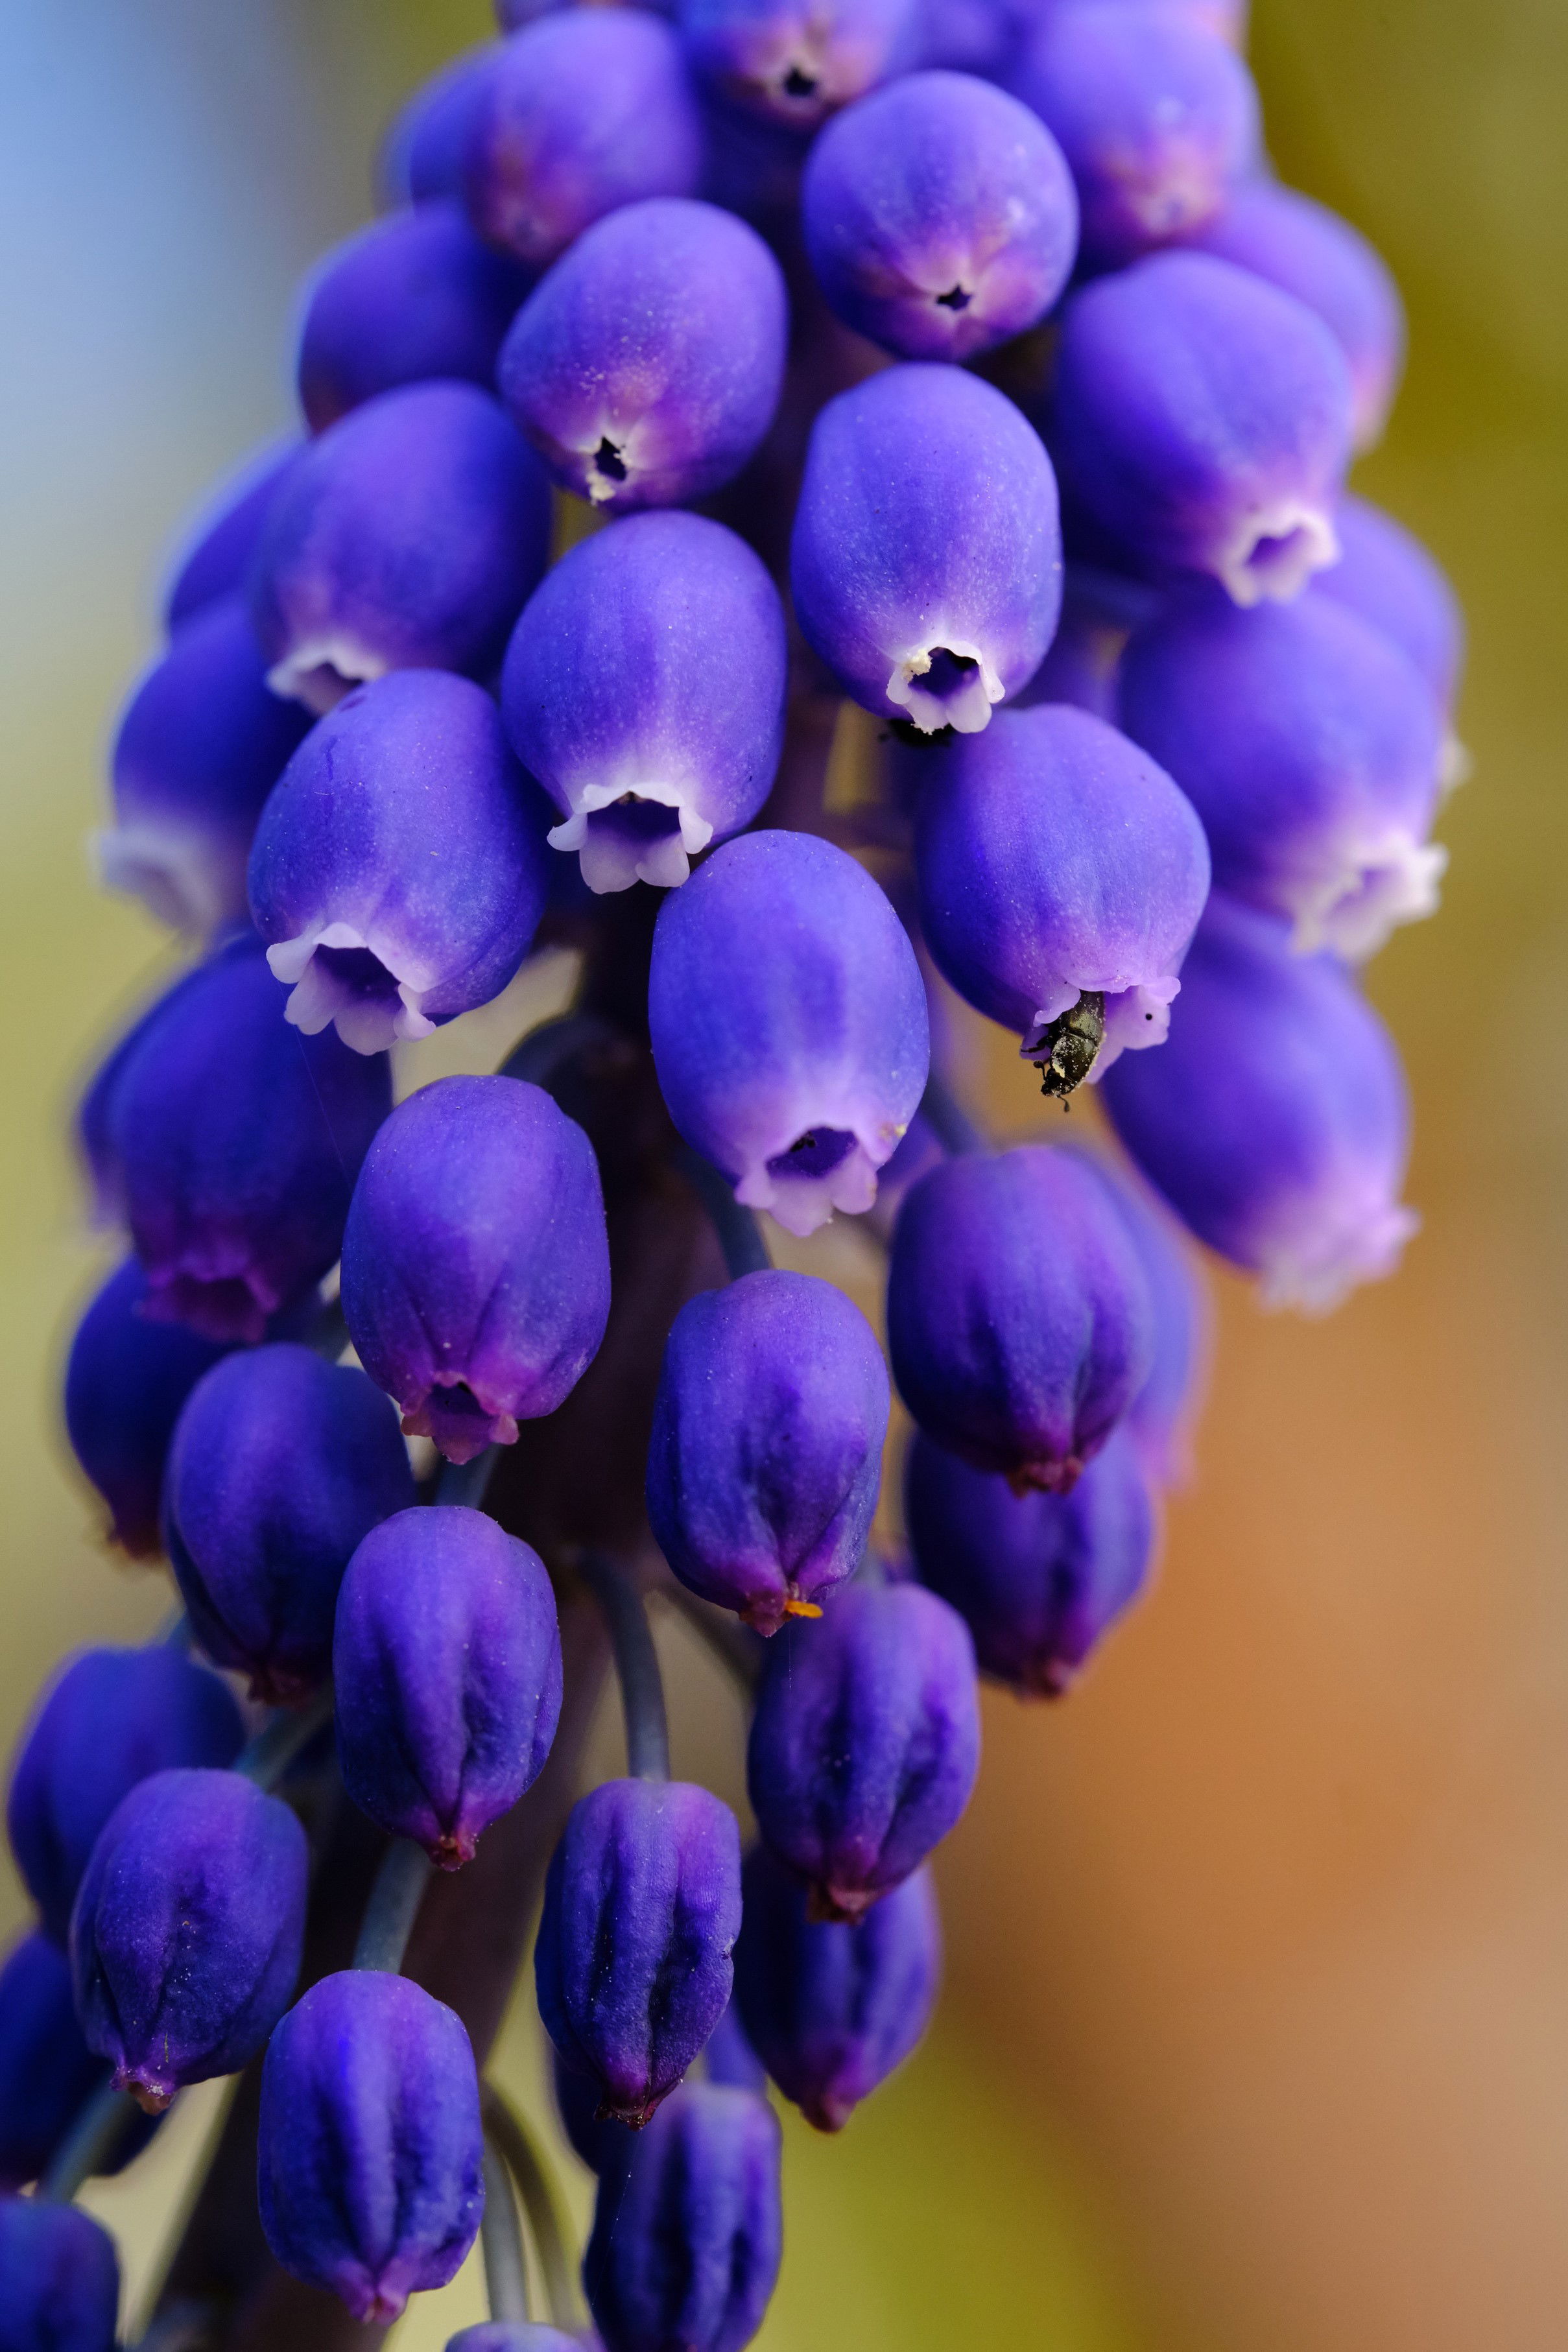
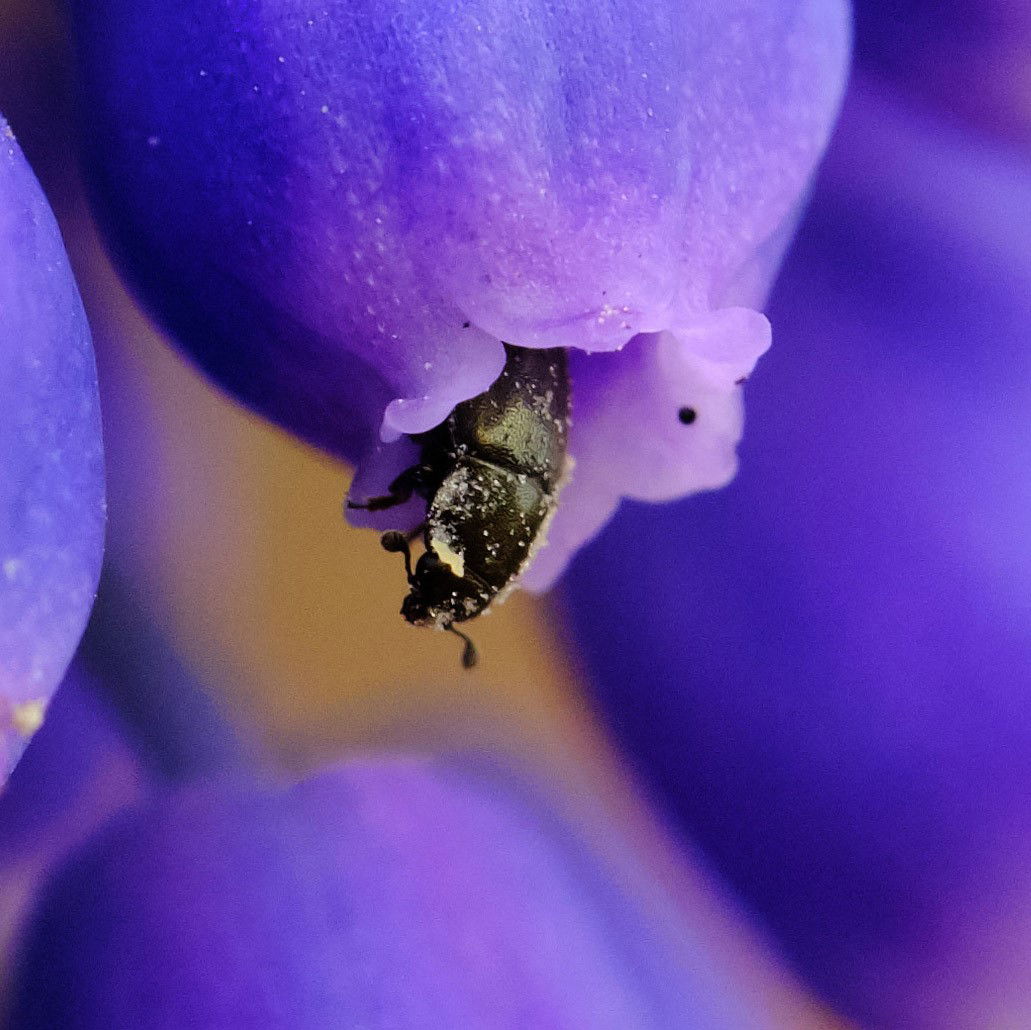
The solution was using the X-T3’s Color Chrome effect, which is accessed in IMAGE QUALITY SETTING > COLOR CHROME EFFECT. When we looked at the result a little closer, we saw a visitor – can you see the small beetle trying to get inside one of the flower heads? The resolving power of the XF80mmF2.8 R LM OIS WR Macro is so good you can even make out the grains of pollen on its back. Impressive stuff.
PART 2: Focus bracketing and stacking
One of the hardest aspects of shooting macro photography is controlling what’s in focus and what’s not. Depth-of-field (the zone of acceptable sharpness in front and behind the point of focus) gets shallower the closer you are to your subject. At macro distances, the depth-of-field can be just millimetres, even at small apertures.
A good way around this problem is focus stacking – shooting frames at slightly different focus points then combining these in software like Photoshop to create a completely in-focus picture, with perfect front-to-back sharpness. This used to require specialist macro rails that fitted to the top of your tripod and let the camera glide back and forth, but many X Series cameras now feature automatic focus bracketing, which powers the process of shooting different frames at different focusing distances.
Once the frames have been captured, they can be assembled in your software of choice. We used Photoshop, but other apps are available, such as Affinity Photo and Helicon Focus.
Step 1: Subject selection
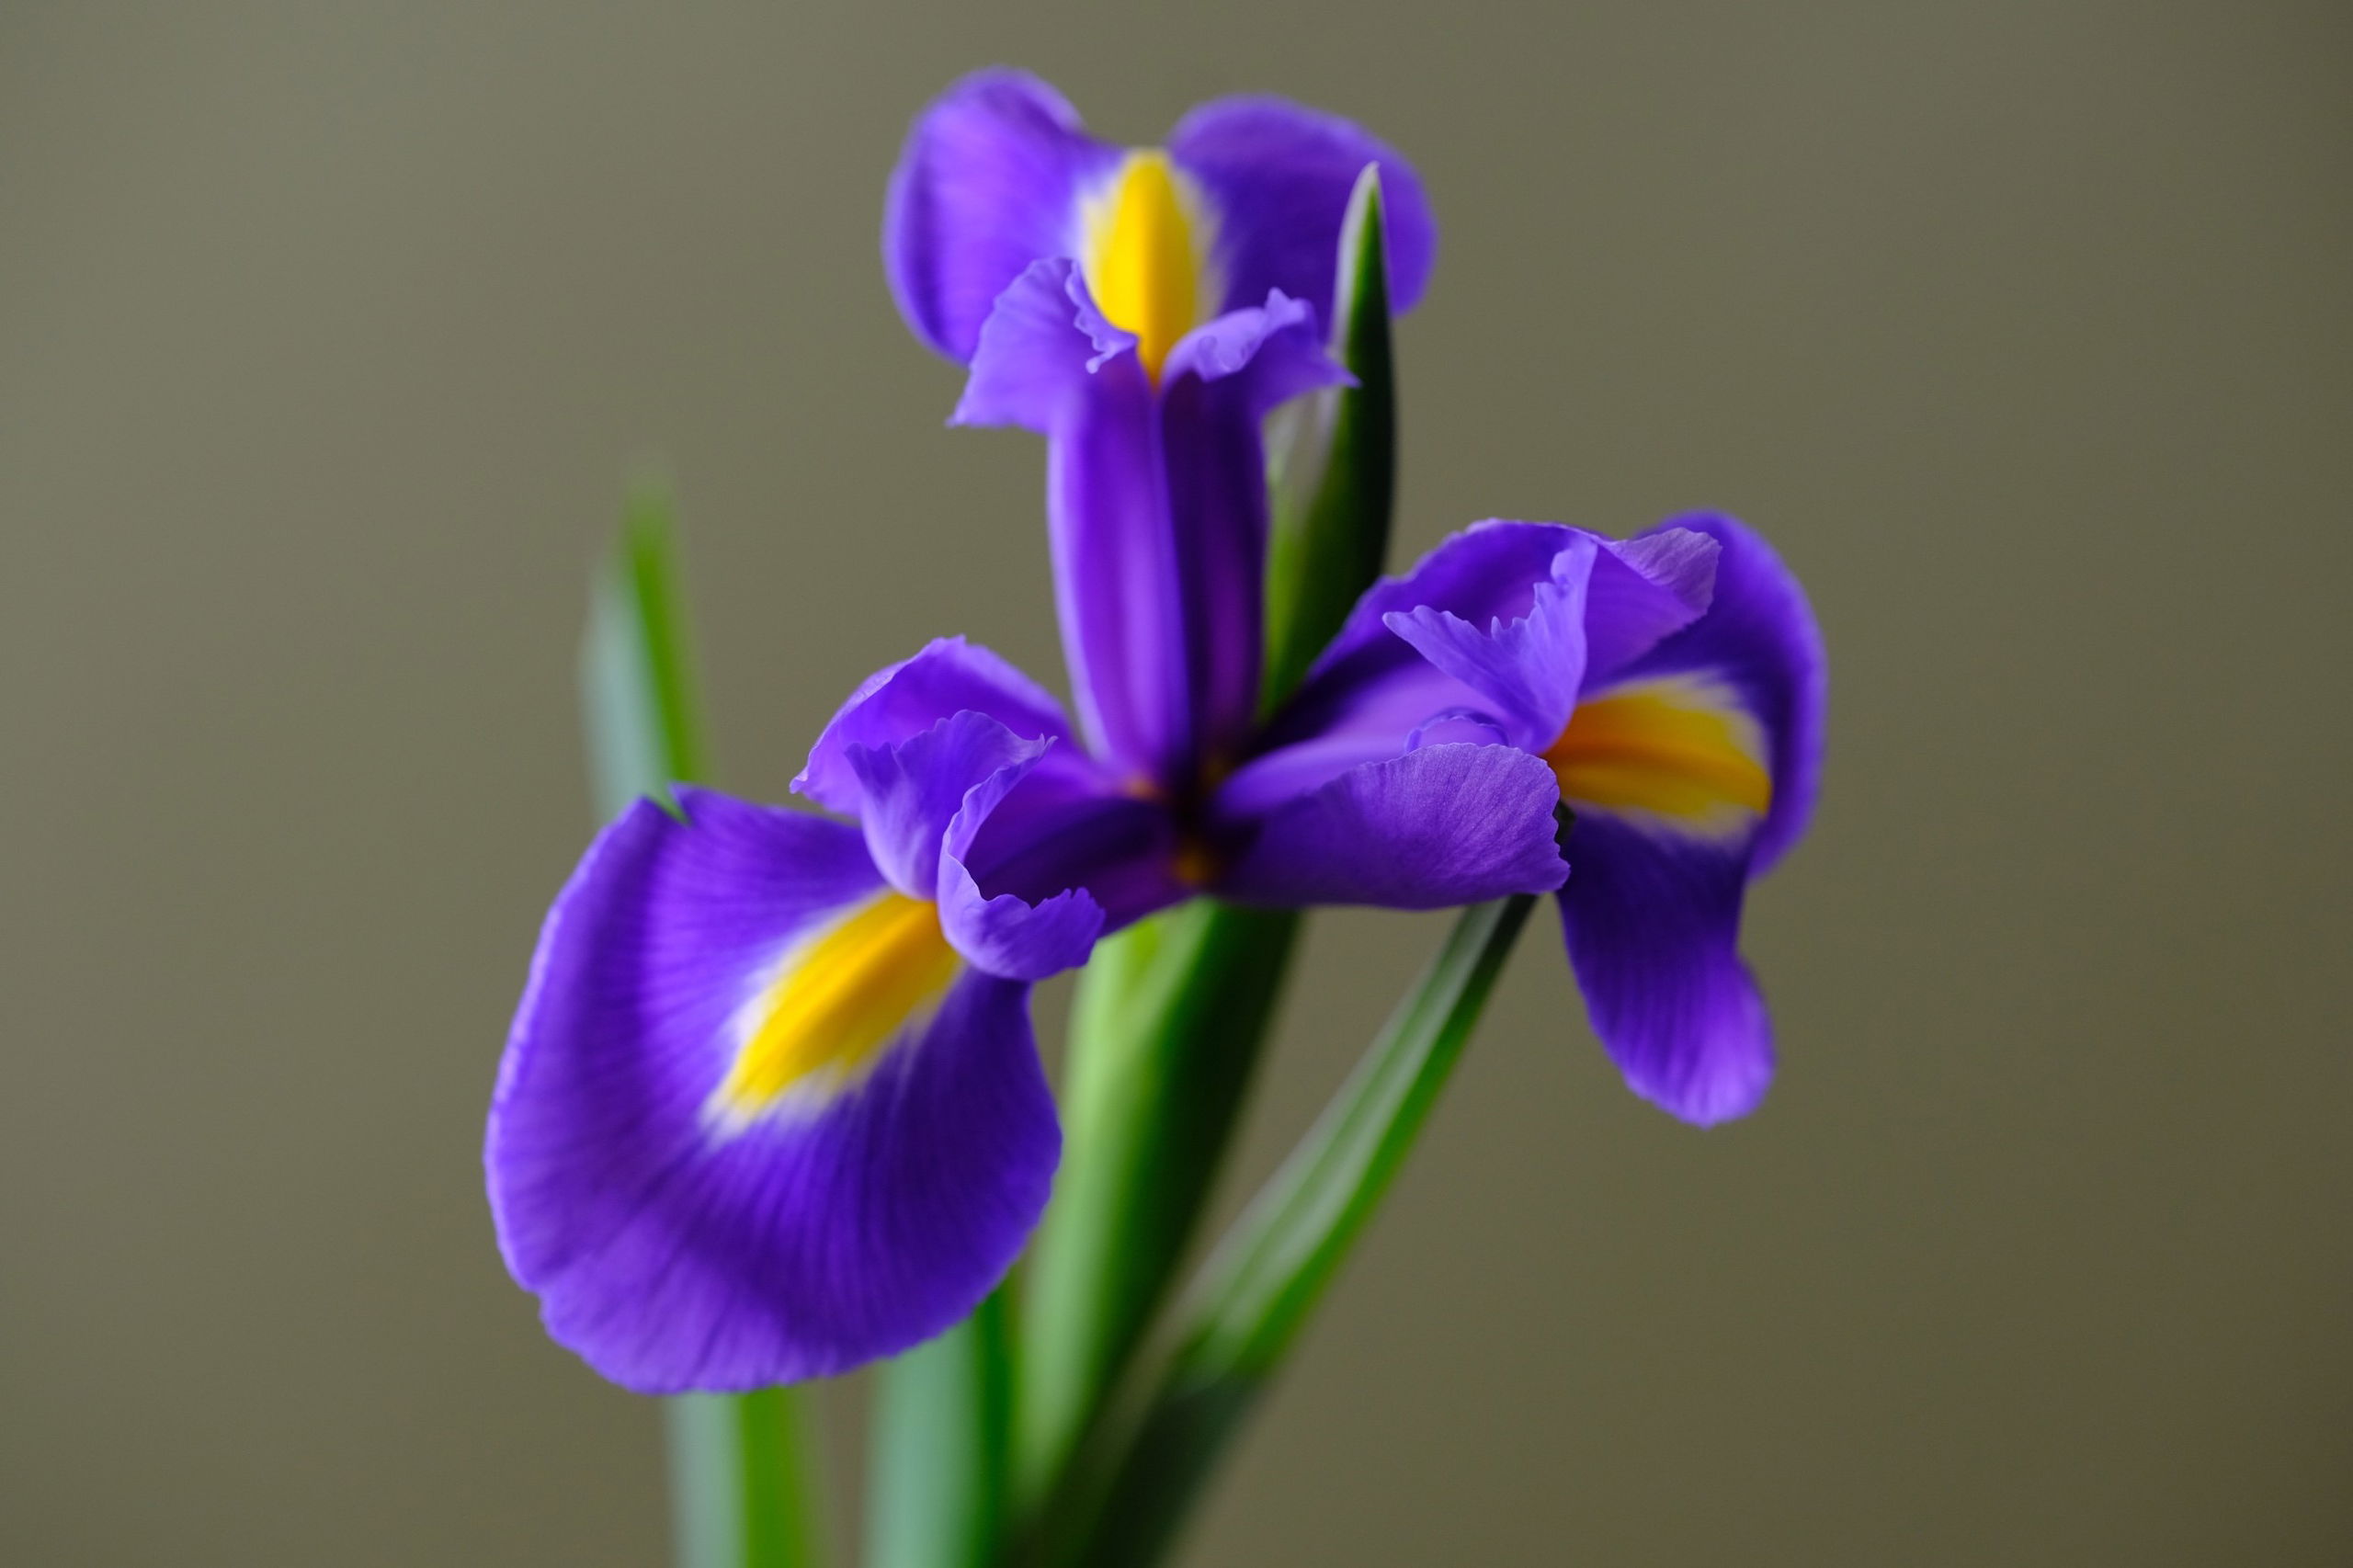
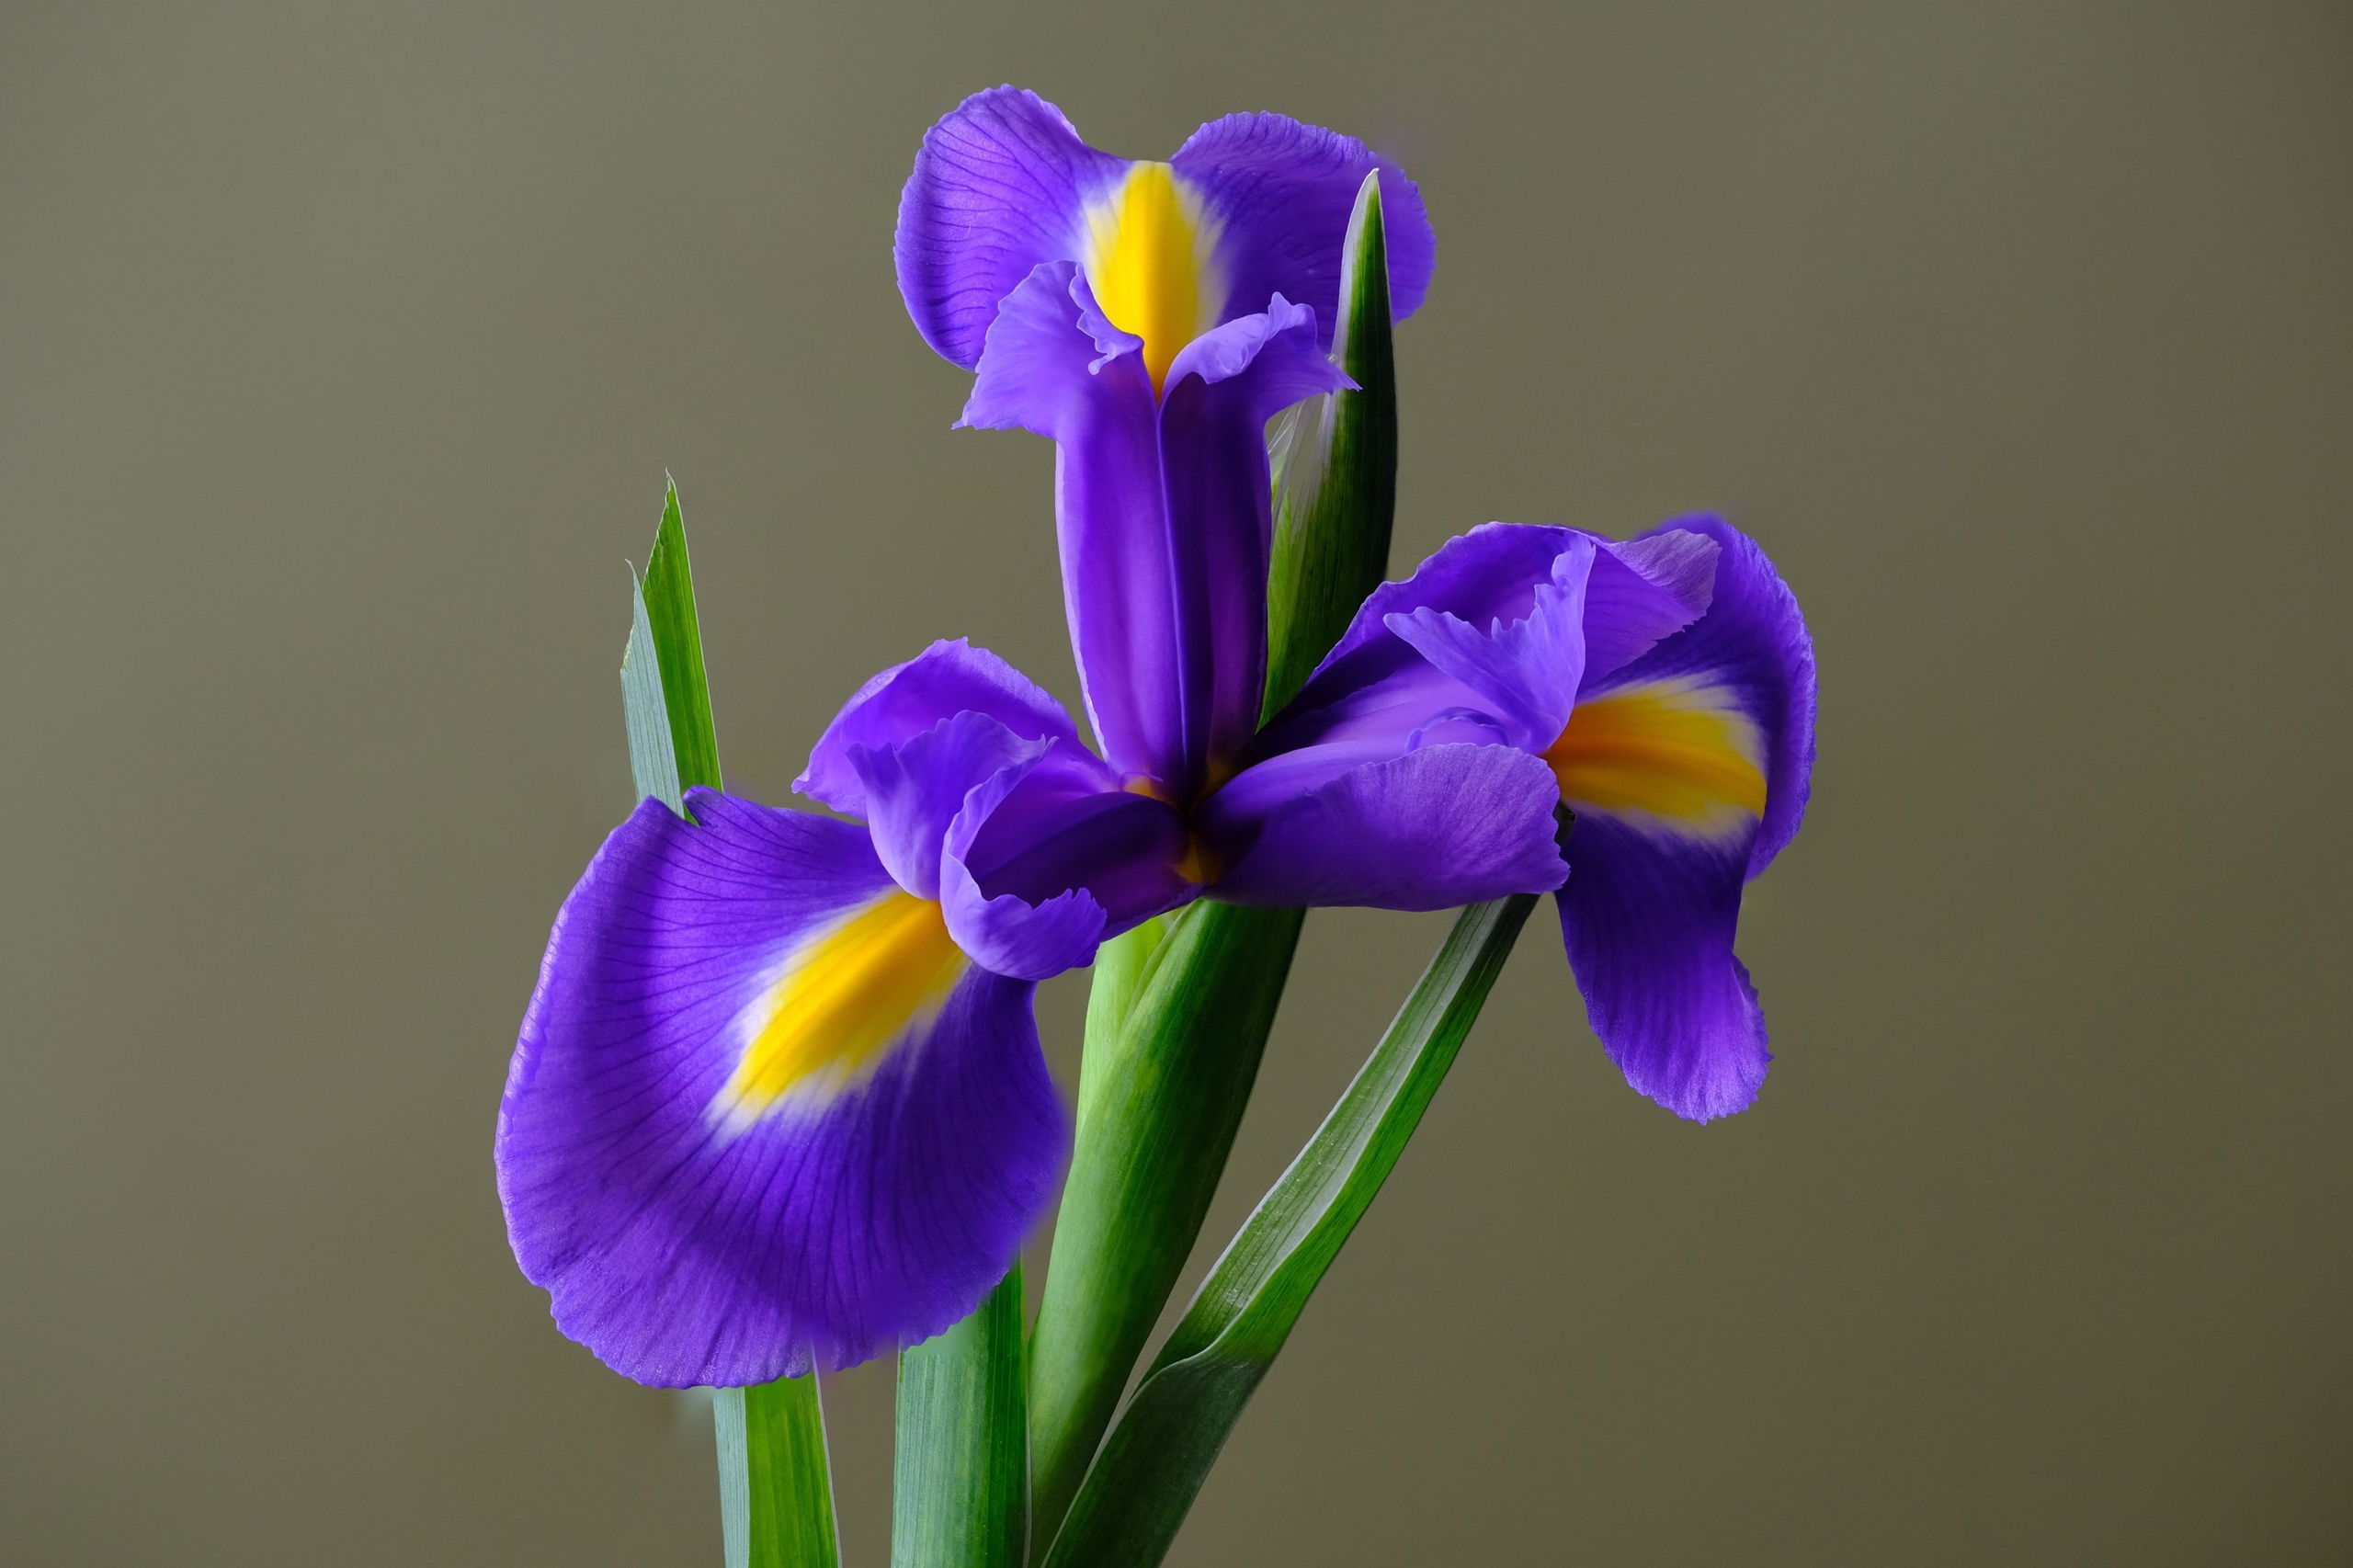
This iris is a strong graphic subject, but it’s several centimetres long, making it difficult to get in focus in one frame. We used the Focus Stacking feature on the X-T3 to capture multiple frames at different focus points. We used an XF80mmF2.8 R LM OIS WR Macro lens and had the camera on a tripod – partly for stability and partly so the camera stayed consistently in the same place. For focus bracketing to work well, the camera needs to stay in the same place for every frame.
Step 2: Focusing manually
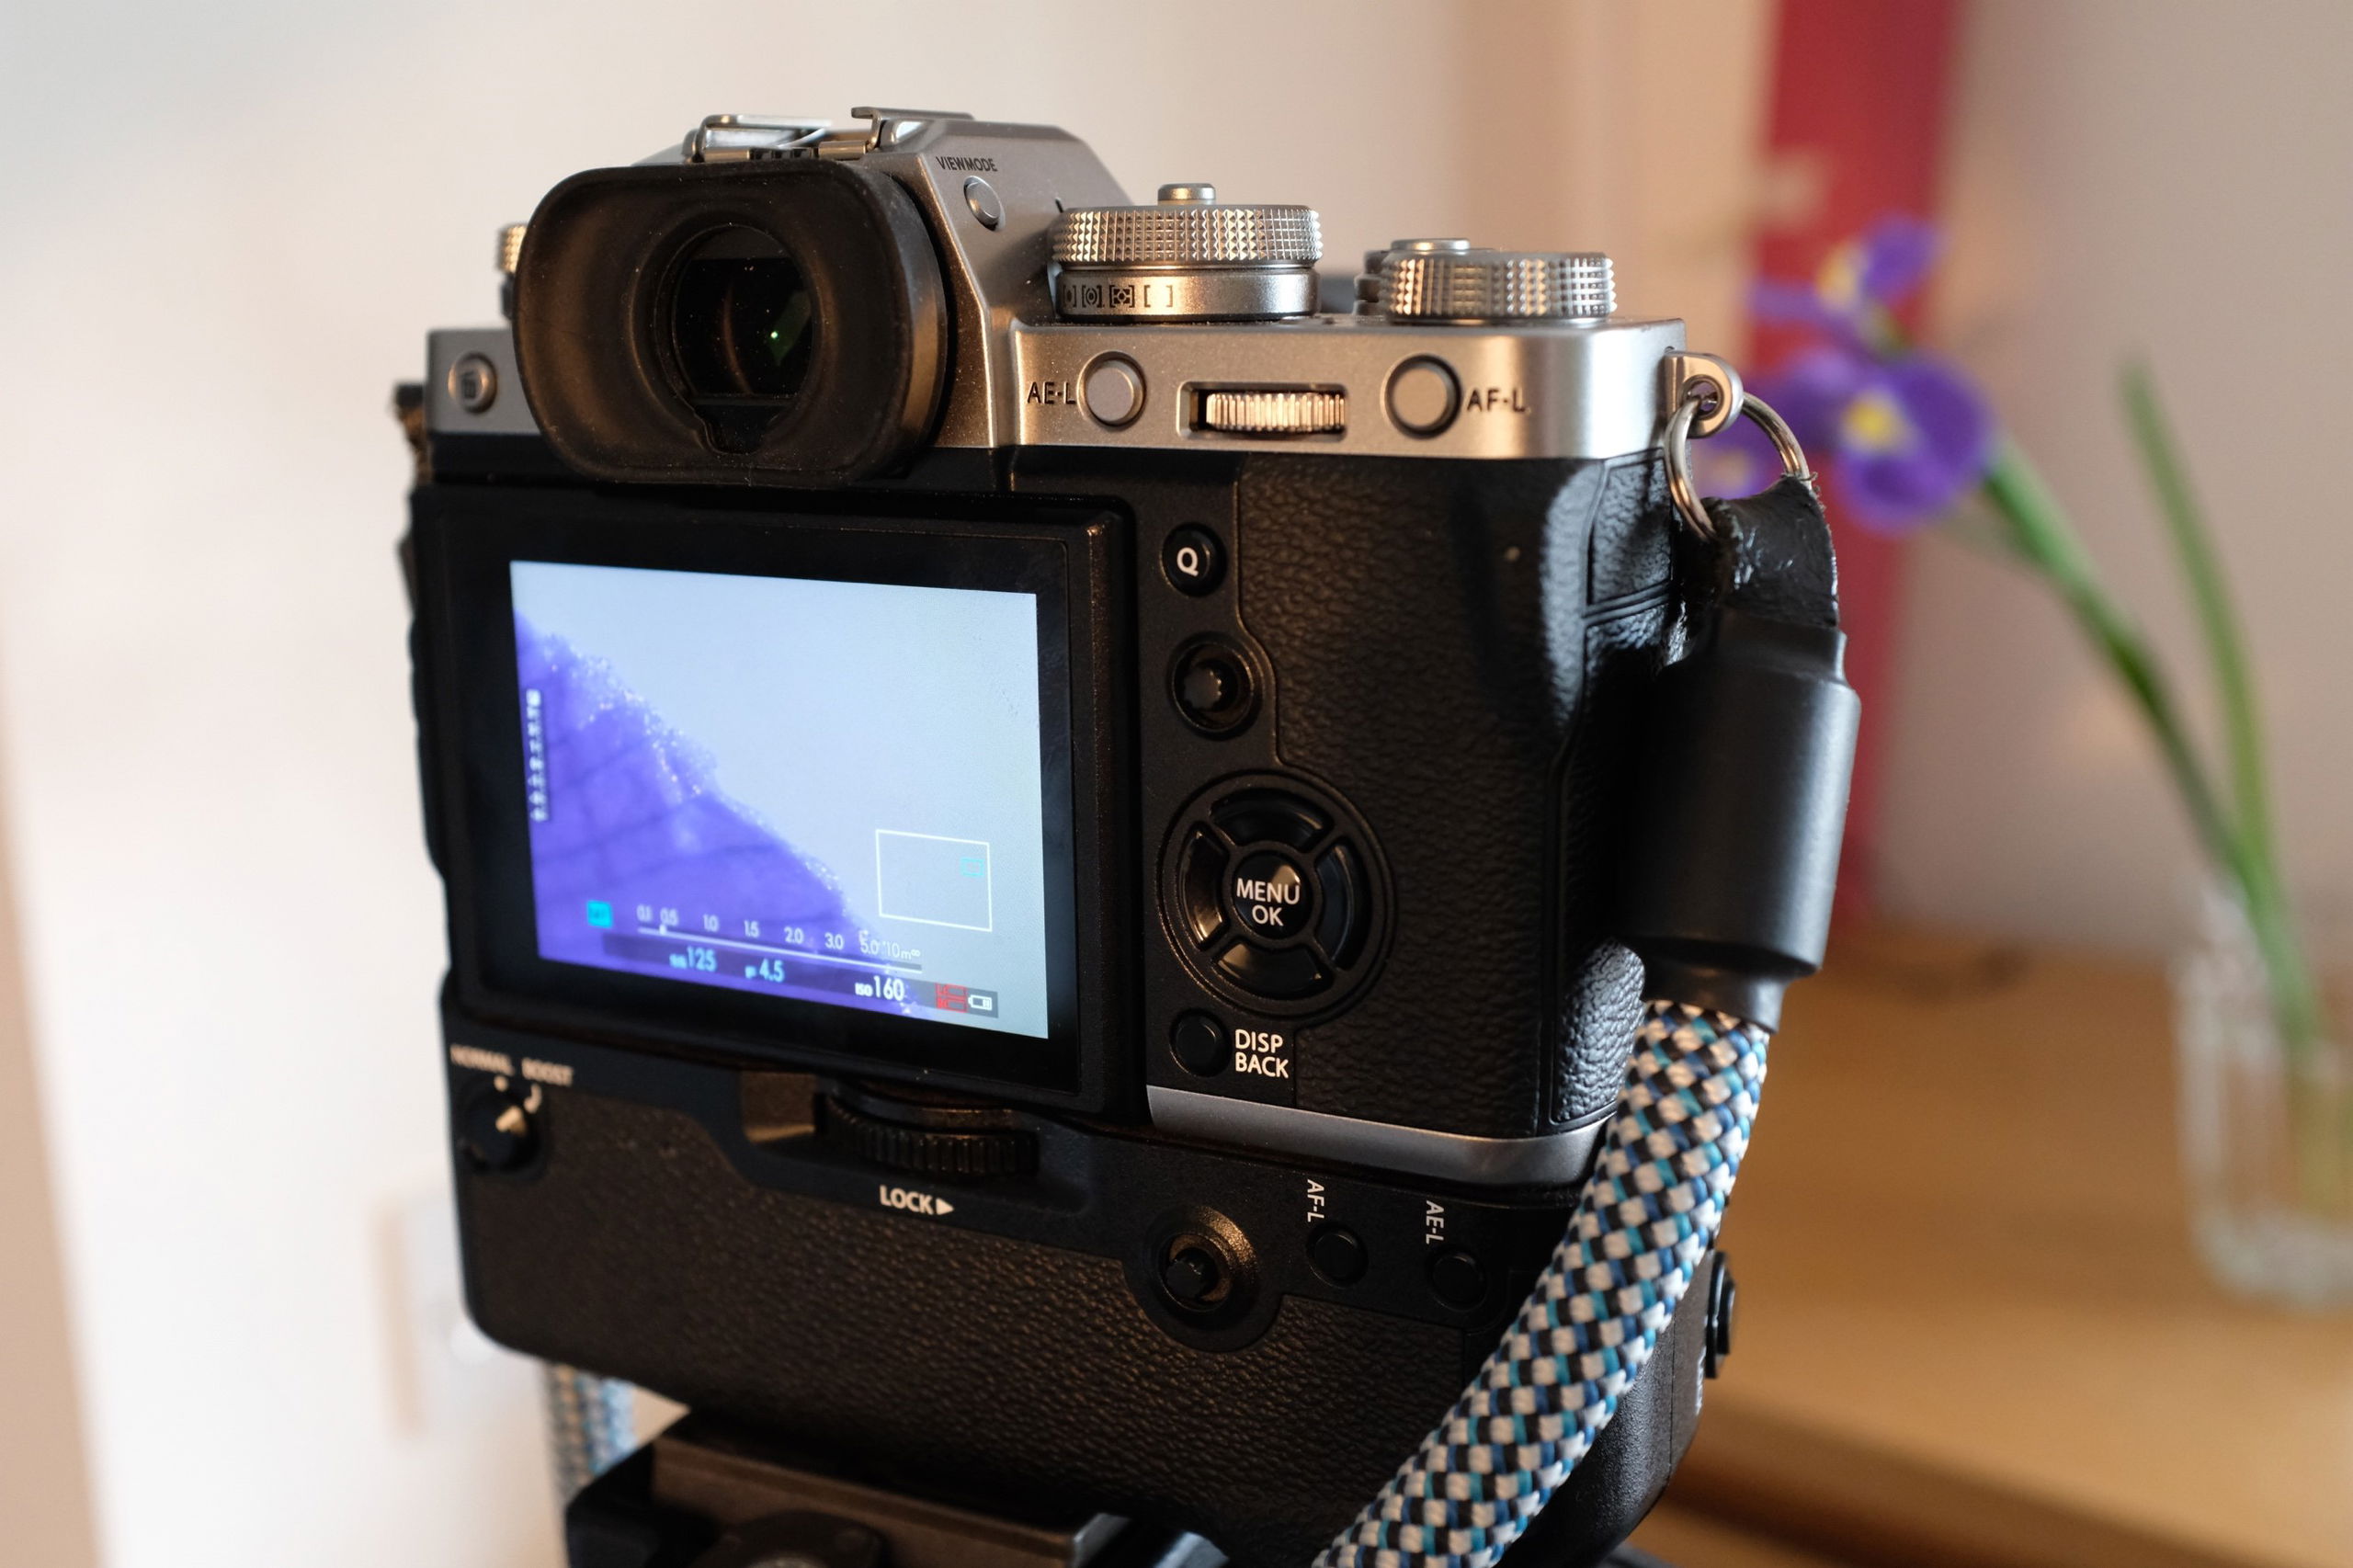
Focus bracketing moves the point of focus backwards, towards infinity. So, the first thing to do is focus on the nearest point you want to be sharp. We did this manually, with Focus Peaking and MF Assist switched on to help.
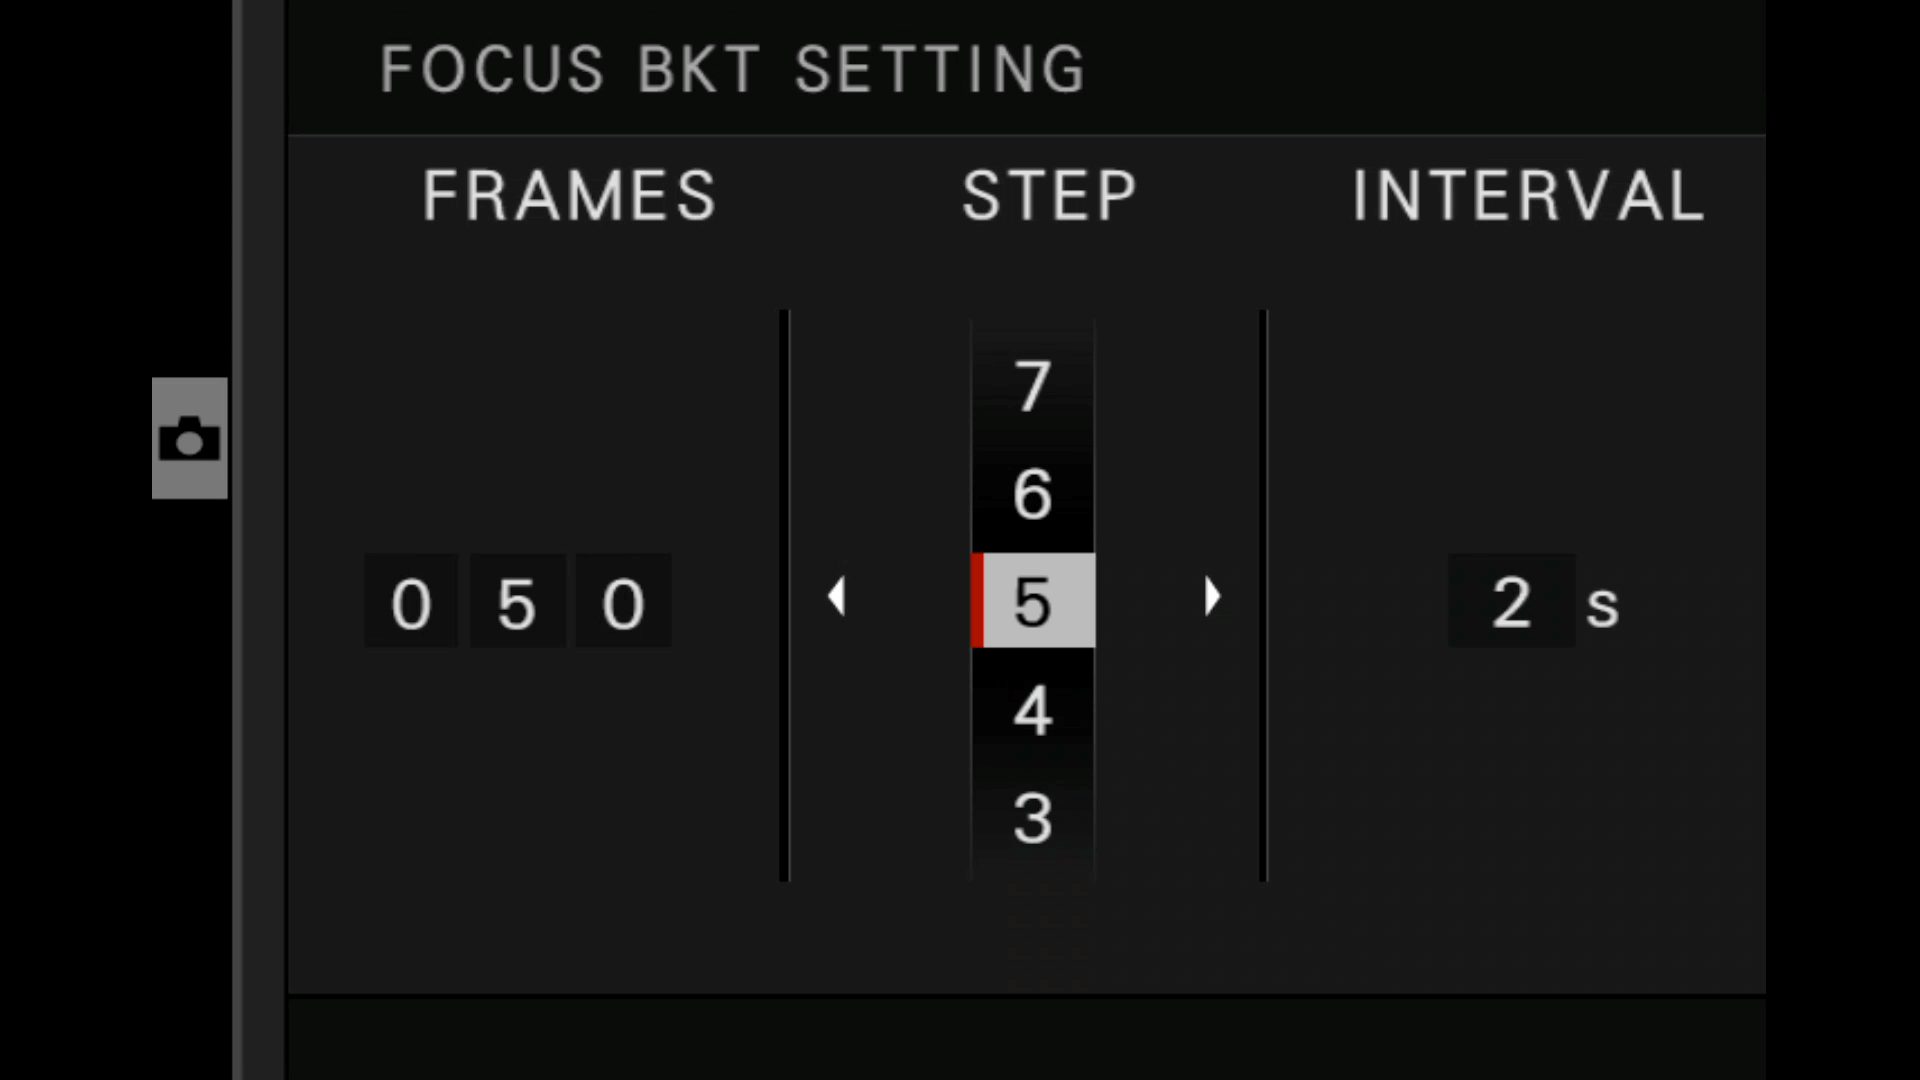
Step 3: Setting up focus bracketing
Focus bracketing can be found in the SHOOTING SETTNG > DRIVE SETTING > BKT SETTING menu. Scroll and select FOCUS BKT. You’ll see three options: FRAMES, STEP and INTERVAL.
• FRAMES determines the number of frames captured between the starting focus point and infinity.
• STEP sets the amount of change in focus distance between each frame, with greater numbers representing more change.
• INTERVAL lets you set a delay between each frame, should you need to.
It takes some experimentation to arrive at the perfect combination of settings, but the following considerations should help:
• When the step between frames decreases, the number of frames required increases.
• When the aperture gets smaller, the number of frames required decreases.
• When subject magnification increases, the number of frames required increases.
• When print/image size increases, the number of frames required increases.
When shooting macro scenes, try the following combination as a starting point: FRAMES 50, STEP 5, INTERVAL 2.
Step 4: Ready to shoot
Set the camera to bracket shooting mode, set the bracketing type to Focus Bracketing and you’re ready to go. To avoid camera shake, trigger the shutter either with the camera’s two-second self-timer (as here), with a wired remote release or using the FUJIFILM Camera Remote app. The camera automatically captures the required number of frames, varying the focus distance as you go.
Step 5: Stacking the results
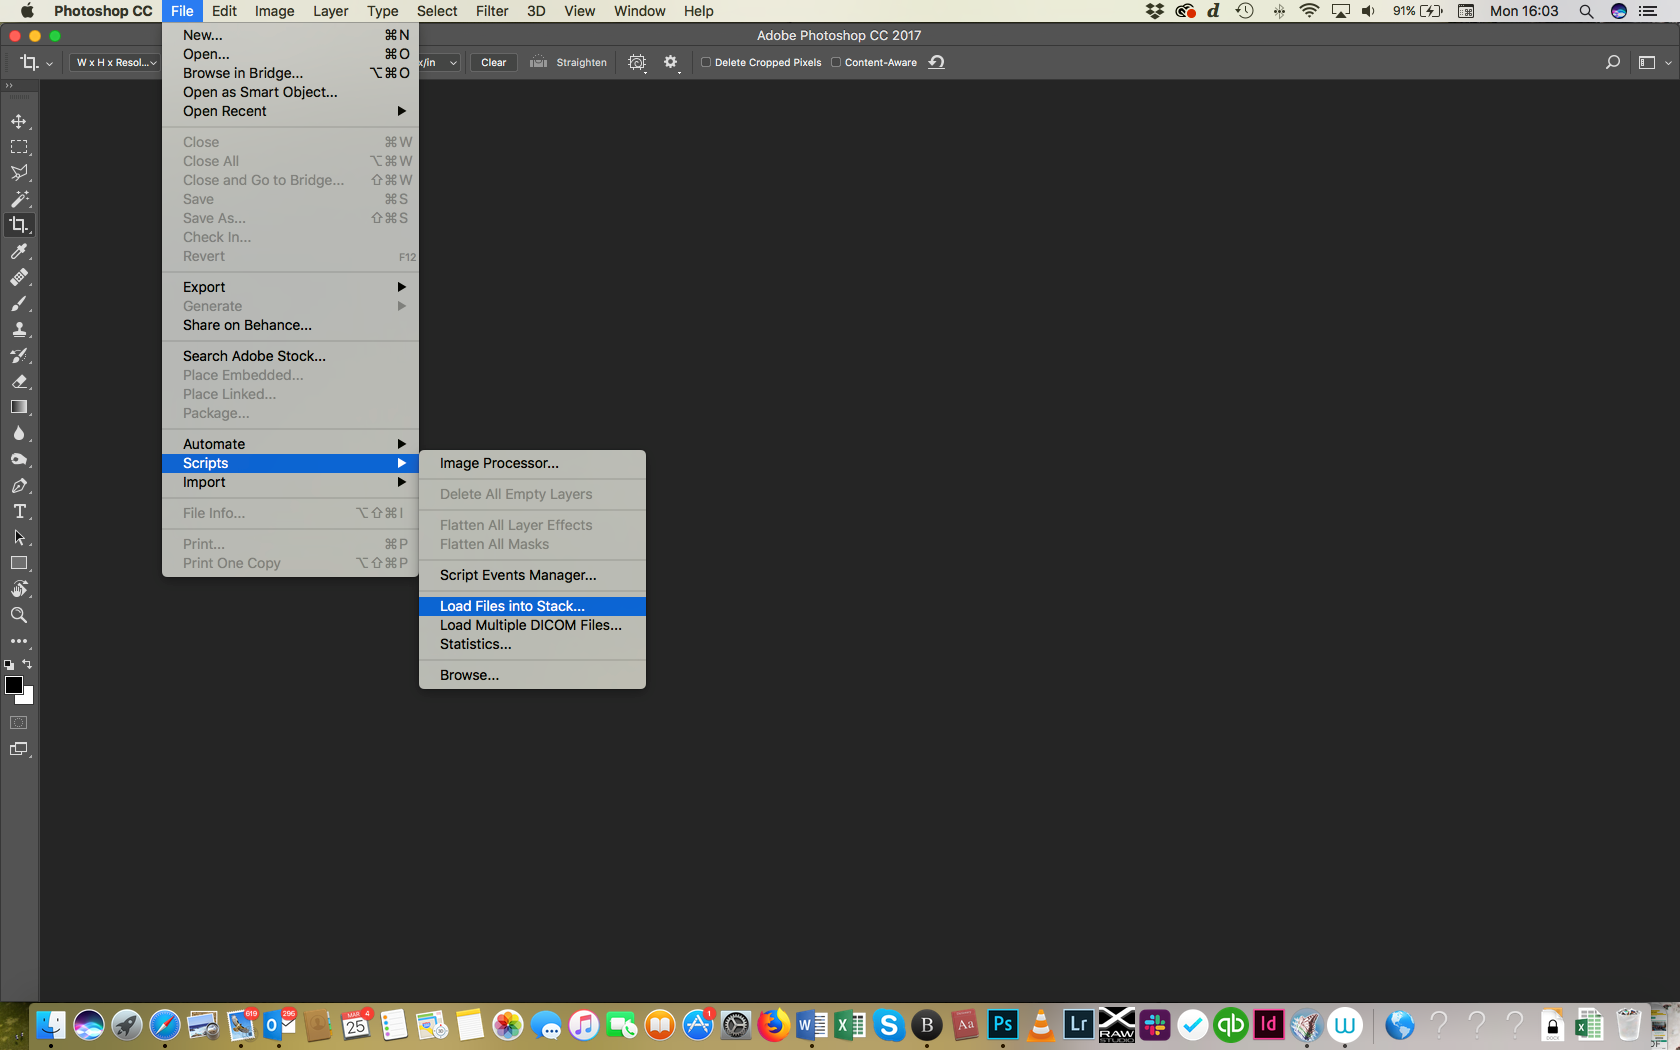
We imported the 50 JPEG pictures into Adobe Photoshop CS 2017 using the File > Scripts > Load Files into Stack. Then, in the Dialogue box, find and select the 50 images you want to import. Click OPEN and then OK. Photoshop will import each frame as a separate layer into a new document.
Step 6: Blending the layers
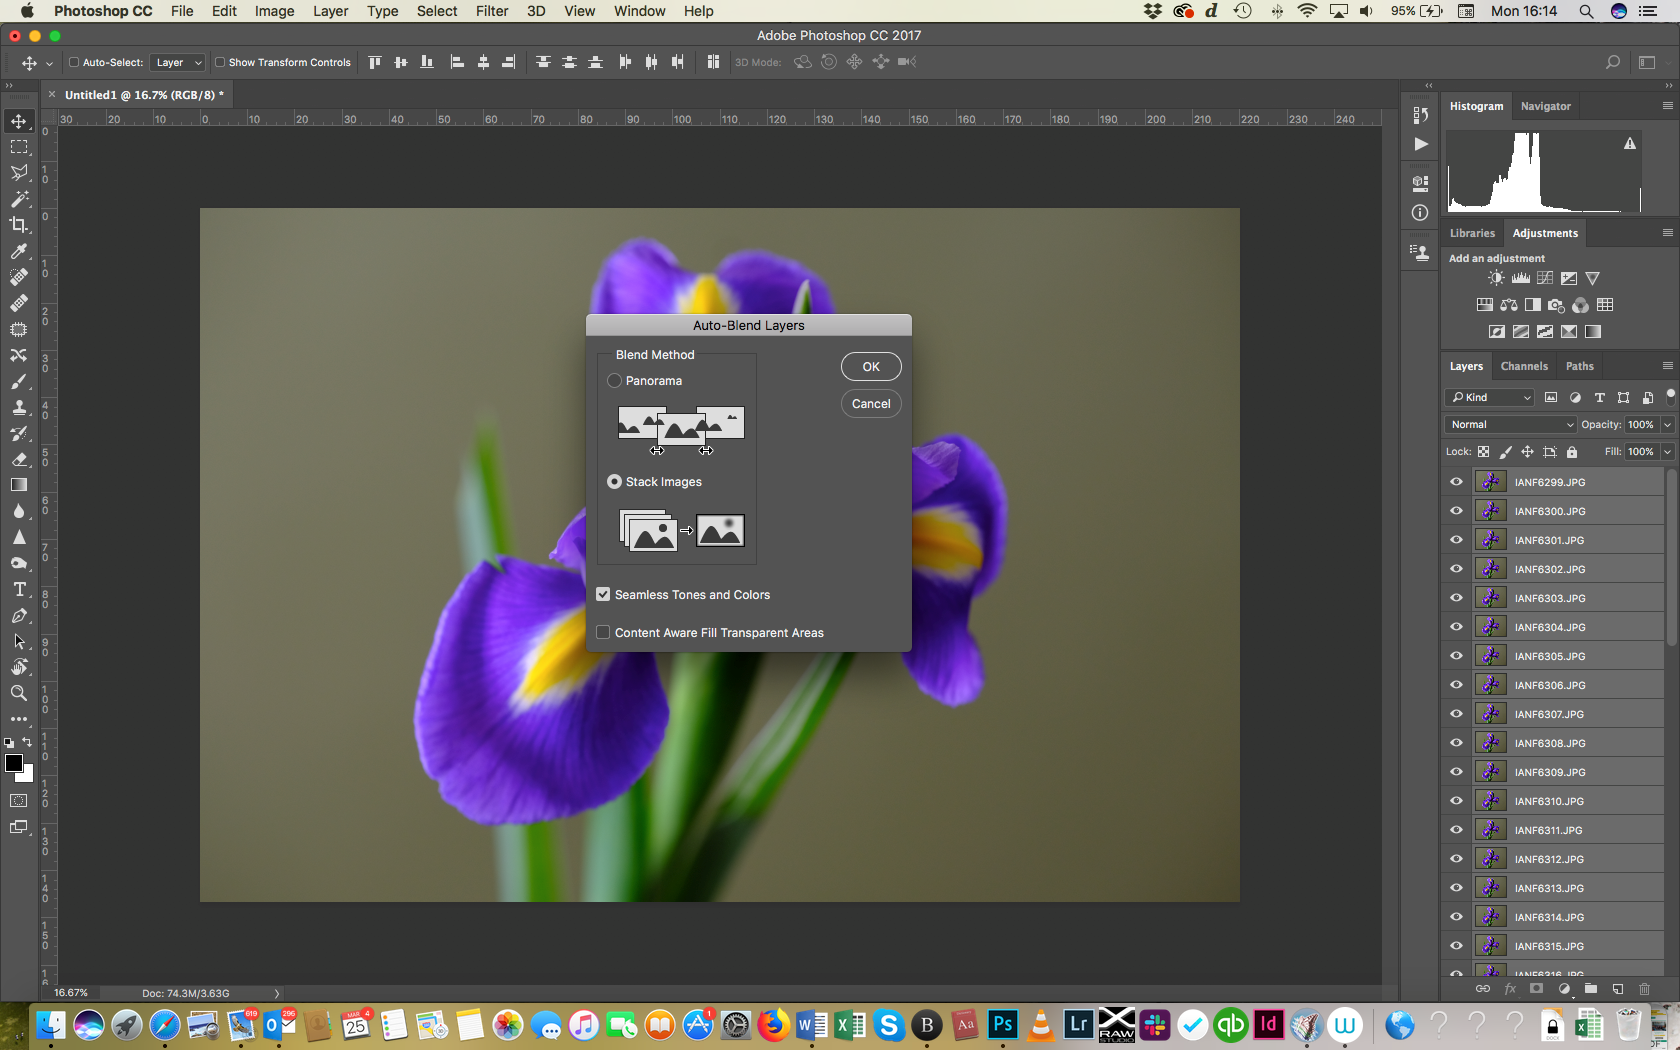
To focus stack the different layers, select them all (by clicking the first layer in the Layers palette and shift-clicking the last one), then select EDIT > AUTO BLEND LAYERS. Choose the Stack Images option and click OK. Depending on the number of the image files and the speed of your computer, this may take a few minutes.
Step 7: Final touches
You might notice a few little glitches caused by the merging process, but hopefully not too many. You can usually fix these by flattening the image (Layer > Flatten Image) and using the Clone Stamp and Healing Brush tools.


