 7 minute read
Make Better Images Indoors
Master available light and get superb photos wherever you are
Whatever you’re photographing – be it people, pets, still life, or even interiors – for beautiful indoor images with perfect colour, you need to know how to respond to available light.
Put simply, available light is the light that’s naturally in the scene, with nothing added by you, the photographer. This light can be anything from the sun flooding in through a window to the light from a tiny candle.
The way that available light varies in colour and intensity can make it tricky to record correctly. For instance, if not recorded in the right way, colours can seem unnatural and the image may be lighter or darker than intended. But this is where your FUJIFILM X Series camera comes in.
Your X Series camera is a sophisticated tool that will give you stunning results, but when it comes to tricky lighting conditions, a few easy steps will make sure your pictures look as natural as possible!

Photo © Victoria Wright
What You See Is What You Get
Using your camera’s electronic viewfinder, or the main LCD screen, is a real benefit when it comes to working with available light. It gives you a completely accurate view of how the picture will be when you hit the shutter, so there’s no more guesswork like when you’re making images with a DSLR. Trust what you see, because that’s how the picture is going to turn out!
Any changes you make to the exposure – for instance using exposure compensation or changing the white balance – will be visible right there in front of your eyes. This means you can get the picture exactly as you want it.
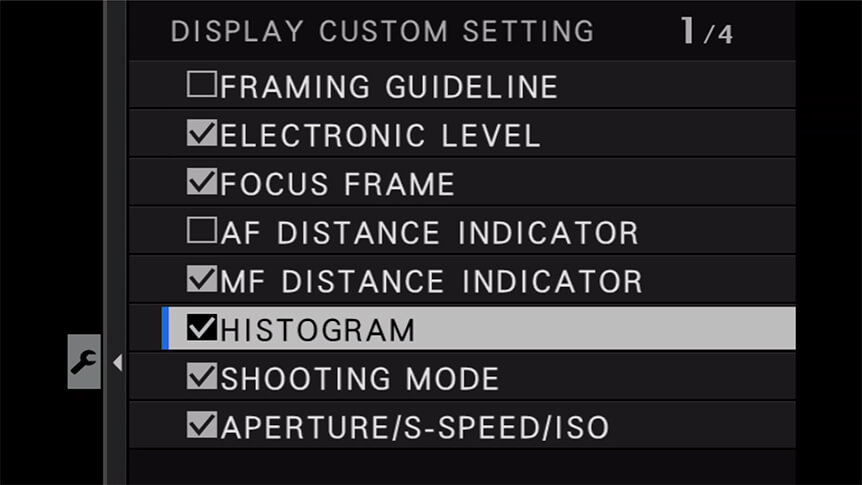
An electronic viewfinder has other benefits, too. You can add a live histogram to the display, showing how bright or dark the image you’ll make is. To add a live histogram, just follow these steps:
You only have to do this once and the histogram will show each time you turn on your camera. You can always change how that information is displayed by pressing the DISP/BACK button until you see the information you want.
Use Auto ISO
Available light can be inconsistent, so it’s important to be adaptable. And the photographer’s secret weapon for that is ISO! Unlike in the days of film, where you’d need to change a whole roll of film to adjust the sensitivity, your camera’s ISO setting can be changed at will, according to the light levels.
Even better, if you set the ISO to Auto, you can let it adjust automatically, either increasing or decreasing depending on the light levels and ensuring you get a good exposure every time.
Worried about the ISO going too high? Don’t be. Not only can you limit the maximum ISO used in Auto mode, you’ll be surprised at how good the images look, even at settings like 3200 and 6400. Here’s how to set up Auto ISO:
What’s more, you can set a minimum shutter speed with the Auto ISO. This means it won’t drop below that setting, so if you need extra sharpness – say, when photographing a moving subject indoors – all you need to do is tell the camera to do it! Here’s how you set it on your camera:
Note that control over Auto ISO is only available in the Program, Aperture Priority, Shutter Priority, or Manual modes. In other options, the camera uses Auto ISO automatically:
The three settings you can change are:
- DEFAULT SENSITIVITY – this is the ISO the camera will use if enough light is available. We suggest you set this to a low setting, like ISO 200 or 400.
- MAX SENSITIVITY – this is the highest ISO the camera will use. The setting you use here will depend on how much digital noise you’re willing to see in the image. The higher the ISO, the more there will be. Try shooting lots of frames at different ISOs to see the maximum that works for you, then dial in that number.
- MIN SHUTTER SPEED – this is the lowest shutter speed the camera will use. The shutter speed you use here should be one where you can confidently take a picture without it being blurred by camera shake – the vibration that’s noticeable in images at slower speeds. Camera shake depends on a lot of factors, like your shooting technique and the focal length of the lens you’re using. Again, take some test shots to see what’s best for you, then dial in the setting.
Use a Reflector
Just because available light can’t be increased or decreased in intensity, you can still modify it to your heart’s desire. Modification simply means changing the way the light is filtered or directed, and this is exactly what you’d do if you were working with flash or LED lights, so it makes sense to do the same. There are simple ways to do it, and their effect is instant.

Photo © Victoria Wright
Say you’re making a portrait by a window. Even on a cloudy day, you may find that part of your subject’s face is in shadow. A reflector can help here. If you don’t have a purpose-made reflector, just use a large sheet of white card or paper and hold it up towards your subject. As light bounces back from it, it will fill in shadows and lower the contrast for a more flattering effect.
You can also diffuse and shape available light. Using the same window-lit portrait as an example, why not try adding a fine net curtain or voile over the window to soften the light? Another option is to draw the curtains slightly to limit the spill and create more shadow.
“Just because available light can’t be increased or decreased in intensity, you can still modify it to your heart’s desire”

Photo © Victoria Wright
Open up to Light
To give yourself the maximum chance of success in all sorts of available lighting conditions, and when light levels are low, it’s a good idea to choose fast lenses. A ‘fast’ lens is one that has a wide maximum aperture, shown by the low f-stops in their names. A wide maximum aperture means you can photograph more easily when it’s dark, and it will also give great subject separation.
The X Series has plenty of options. Try the FUJINON XF18mmF2 R if you need a wide-angle approach, such as for interiors or portraits where the subject’s location is important to the story. The same goes for the XF35mmF1.4 R, which gives a view close to that of the human eye. If you’re photographing small subjects and close-ups, like food, flowers, or even pets, try the XF60mmF2.4 R Macro. It’s a good choice for portraits, but the undisputed master there is the XF56mmF1.2 R, which can make images in very low light. And if you want a great zoom lens for available light, try the XF16-55mmF2.8 R LM WR, which can be used for almost any photographic subject and in any light.

Photo © Victoria Wright
Pick the Right White Balance
Different light sources give different colour tones in photos, and the white balance setting (WB) is there to help remove the unwanted ones. Your own eye naturally adapts to this, but a camera needs some help.
For instance, when making portraits indoors with regular room lighting, or photographing food in a dimly lit location, like a restaurant or bar, images can appear very warm and orange if you’re shooting in on the wrong setting.

Photo © Victoria Wright
To counteract this, try switching your white balance to Incandescent/Tungsten. This will cool down the image for a more pleasing and natural look.
To experiment with white balance, press MENU OK and, under IMAGE QUALITY SETTING, scroll down to WHITE BALANCE, press OK (or scroll to the right) for multiple settings. You’ll then be able to move through the different white balance options and see on the screen which looks best. You can also quickly access white balance through the Q Menu via the Q button on the camera body. On some X Series cameras white balance settings also have a default shortcut which is the right directional (d-pad) arrow.
For the most natural results, choose the white balance that suits the ambient lighting you’re in, or stick to Auto. Most of the time, Auto will get it spot on. But remember you can also change the setting to warm up or cool down a picture for a fun, creative effect!


