5 minute read
Strategies to Cope with Low Light
In photography, light is everything. That's why creating good pictures when it gets dark can be tricky. Thankfully, your X Series camera has some features that will help you capture the ambience of even the poorest-lit occasions.
When light levels get low, it can be hard to frame clean, crisp pictures in the same way as you might in bright, sunny conditions. Maybe it’s getting towards the end of the day, or you’ve moved inside to an ‘atmospheric’ (ie gloomy and dark) location. Well fear not, there are many strategies to cope with this kind of challenge – some focused towards convenience, others towards absolute picture quality.
But before we look at ways to deal with bad light, let’s have a review about why it’s a problem in the first place. When talking about the fundamentals of photography, we looked at exposure – the brightness of a picture. We established that there are three things we can do to make a picture brighter: make the shutter speed longer; increase the size of the aperture; and raise the ISO sensitivity of the camera’s sensor.
Most problems in low light come when the aperture can’t be opened any wider, and so longer and longer shutter speeds are used until we encounter camera shake – blur caused by movement of the camera while the shutter is open. Stopping this blur is key to photographing in low light. There are five ways to do it…
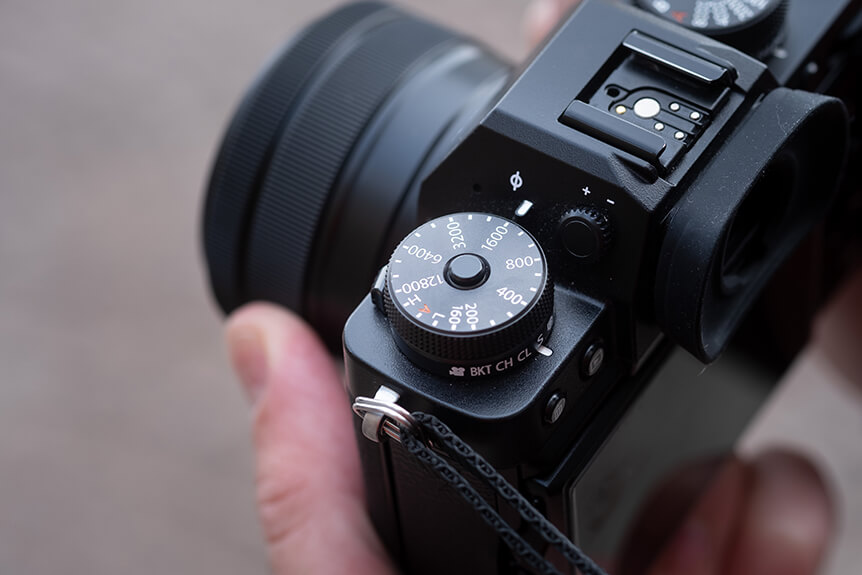
Raise the ISO Sensitivity
The third variable, mentioned above, that affects brightness is ISO sensitivity. In gloomy conditions, it’s helpful to raise it so that shutter speeds stay fast enough to avoid camera shake. There are different ways to do this, depending on how your camera works. Some X Series cameras have a dedicated ISO dial, while others have a function button for accessing ISO sensitivity. Consult your camera’s user manual if you’re not sure where your ISO control is.
Use a Faster Aperture
Raising ISO sensitivity isn’t the only way to achieve faster shutter speeds. You can also increase the size of the lens’s aperture to let in more light. And if you are at the limit of your camera’s standard zoom lens, why not consider one of the large-aperture prime lenses in the X Series? For a slightly wide-angle view that’s good for all kinds of photography, the XF23mmF1.4 R is a great lens that lets in roughly 2.5x more light than a standard zoom at the same focal length. Or what about our famous XF56mmF1.2 R, that lets through a massive 4.5 stops of extra light? That’s enough to take a blurry 1/4 sec shutter speed to a perfectly handholdable 1/100 sec.

Switch on Image Stabilisation
Optical Image Stabilization (OIS) and In-Body Image Stabilization (IBIS) can smooth out the accidental movements that would otherwise cause camera shake at slow shutter speeds. Both use tiny gyroscopes built into the lens or the camera body to sense movement, then counteract these movements either by shifting one of the glass elements inside the lens, or moving the sensor to compensate.
Depending on which OIS-equipped lens you’re using, it can be switched on using a button on the lens’s barrel, or controlled from within the camera’s SHOOTING SETTING menu. IBIS is also controlled from within the SHOOTING SETTING menu.
The benefit of OIS or IBIS is measured in stops. So a five-stop benefit will mean you can photograph at shutter speeds five times slower than usual without noticing camera shake.


Bear in mind, though, that moving objects in the frame will still blur if they move when the shutter is open. OIS and IBIS are only effective at smoothing out the camera movement/shaking.
Use a Tripod
Ultimately, the most effective way to eliminate camera shake is to use a tripod to ensure the camera is kept perfectly still when you make an image, even though this may not be very convenient in some situations.

Even when you do use a tripod, it might also help to trip the camera’s shutter using either a two-second self-timer, a remote release, or your smartphone running the FUJIFILM Camera Remote app. This will avoid any additional camera shake caused by physically touching the camera’s shutter release button.
Use Your Flash
Conventionally, when partygoers find themselves in low-light situations, they switch on their camera’s flash and fire away. This can be an effective way to get sharp pictures in low-light conditions, and is incredibly convenient, but it’s not always going to give you the best results.
This is because the flash becomes the dominant light source in the picture, taking over from the atmospheric lighting that might otherwise be illuminating the occasion. So when you use a flash, it robs you of the ambience that perhaps motivated you to create a picture in the first place!
That’s not to say flash isn’t worthwhile – it certainly has its uses, just be careful to think whether it’s the right approach or if one of the others we’ve outlined here would be better. To keep some of the location’s ambient light in the image, choose a slower shutter speed along with the flash.

Your Next Steps
- CHALLENGE Go out in the evening and create an image that conveys the atmosphere of the streets in your hometown at dusk. Use the techniques we’ve looked at here to make a picture in different ways – what was most effective for you? Post your favourite image to social media with the hashtag #learnwithfujifilm. You can also submit your work here for a chance to be featured on our social media channels.
- WATCH Check out our video below to learn more about ISO!